
Node.js - One to one video call
This web application consists of a one-to-one video call using WebRTC technology. In other words, this application provides a simple video softphone.
Note
Web browsers require using HTTPS to enable WebRTC, so the web server must use SSL and a certificate file. For instructions, check Configure a Node.js server to use HTTPS.
For convenience, this tutorial already provides dummy self-signed certificates (which will cause a security warning in the browser).
For the impatient: running this example
First of all, you should install Kurento Media Server to run this demo. Please visit the installation guide for further information.
Be sure to have installed Node.js in your system. In an Ubuntu machine, you can install it as follows:
curl -sSL https://deb.nodesource.com/setup_18.x | sudo -E bash -
sudo apt-get install -y nodejs
To launch the application, you need to clone the GitHub project where this demo is hosted, install it and run it:
git clone https://github.com/Kurento/kurento.git
cd kurento/tutorials/javascript-node/one2one-call/
git checkout main
npm install
npm start
If you have problems installing any of the dependencies, please remove them and clean the npm cache, and try to install them again:
rm -r node_modules
npm cache clean
Access the application connecting to the URL https://localhost:8443/ in a WebRTC capable browser (Chrome, Firefox).
Note
These instructions work only if Kurento Media Server is up and running in the same machine
as the tutorial. However, it is possible to connect to a remote KMS in other machine, simply adding
the argument ws_uri to the npm execution command, as follows:
npm start -- --ws_uri=ws://{KMS_HOST}:8888/kurento
In this case you need to use npm version 2. To update it you can use this command:
sudo npm install npm -g
Understanding this example
The following picture shows a screenshot of this demo running in a web browser:
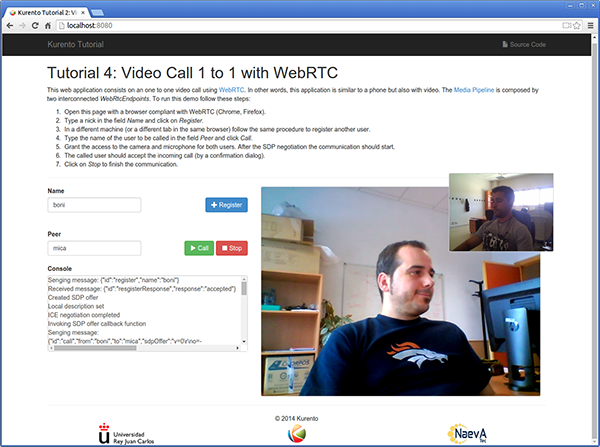
One to one video call screenshot
The interface of the application (an HTML web page) is composed by two HTML5 video tags: one for the local stream and other for the remote peer stream). If two users, A and B, are using the application, the media flow goes this way: The video camera stream of user A is sent to the Kurento Media Server, which sends it to user B. In the same way, B sends to Kurento Media Server, which forwards it to A. This means that KMS is providing a B2B (back-to-back) call service.
To implement this behavior create a Media Pipeline composed by two WebRtC endpoints connected in B2B. The implemented media pipeline is illustrated in the following picture:
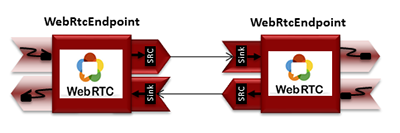
One to one video call Media Pipeline
The client and the server communicate through a signaling protocol based on JSON messages over WebSocket ‘s. The normal sequence between client and application server logic is as follows:
User A is registered in the application server with his name
User B is registered in the application server with her name
User A issues a call to User B
User B accepts the incoming call
The communication is established and media flows between User A and User B
One of the users finishes the video communication
The detailed message flow in a call are shown in the picture below:
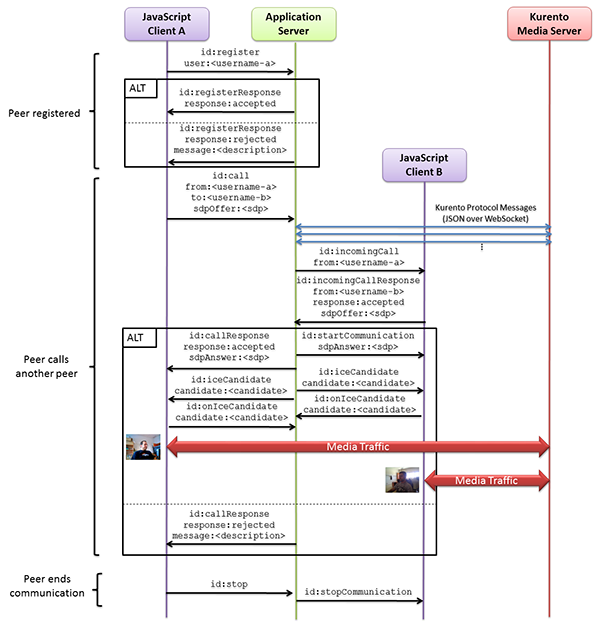
One to many one call signaling protocol
As you can see in the diagram, SDP and ICE candidates need to be exchanged between client and server to establish the WebRTC connection between the Kurento client and server. Specifically, the SDP negotiation connects the WebRtcPeer in the browser with the WebRtcEndpoint in the server. The complete source code of this demo can be found in GitHub.
Application Server Logic
This demo has been developed using the express framework for Node.js, but express is not a requirement for Kurento. The main script of this demo is server.js.
In order to communicate the JavaScript client and the Node application server a
WebSocket is used. The incoming messages to this WebSocket (variable ws in
the code) are conveniently handled to implemented the signaling protocol
depicted in the figure before (i.e. messages register, call,
incomingCallResponse, stop, and onIceCandidate).
var ws = require('ws');

[...]

var wss = new ws.Server({
    server : server,
    path : '/one2one'
});

wss.on('connection', function(ws) {
    var sessionId = nextUniqueId();
    console.log('Connection received with sessionId ' + sessionId);

    ws.on('error', function(error) {
        console.log('Connection ' + sessionId + ' error');
        stop(sessionId);
    });

    ws.on('close', function() {
        console.log('Connection ' + sessionId + ' closed');
        stop(sessionId);
        userRegistry.unregister(sessionId);
    });

    ws.on('message', function(_message) {
        var message = JSON.parse(_message);
        console.log('Connection ' + sessionId + ' received message ', message);

        switch (message.id) {
        case 'register':
            register(sessionId, message.name, ws);
            break;

        case 'call':
            call(sessionId, message.to, message.from, message.sdpOffer);
            break;

        case 'incomingCallResponse':
            incomingCallResponse(sessionId, message.from, message.callResponse, message.sdpOffer, ws);
            break;

        case 'stop':
            stop(sessionId);
            break;

        case 'onIceCandidate':
            onIceCandidate(sessionId, message.candidate);
            break;

        default:
            ws.send(JSON.stringify({
                id : 'error',
                message : 'Invalid message ' + message
            }));
            break;
        }

    });
});
In order to perform a call, each user (the caller and the callee) must be
register in the system. For this reason, in the server-side there is a class
named UserRegistry to store and locate users. Then, the register
message fires the execution of the following function:
// Represents registrar of users
function UserRegistry() {
    this.usersById = {};
    this.usersByName = {};
}

UserRegistry.prototype.register = function(user) {
    this.usersById[user.id] = user;
    this.usersByName[user.name] = user;
}

UserRegistry.prototype.unregister = function(id) {
    var user = this.getById(id);
    if (user) delete this.usersById[id]
    if (user && this.getByName(user.name)) delete this.usersByName[user.name];
}

UserRegistry.prototype.getById = function(id) {
    return this.usersById[id];
}

UserRegistry.prototype.getByName = function(name) {
    return this.usersByName[name];
}

UserRegistry.prototype.removeById = function(id) {
    var userSession = this.usersById[id];
    if (!userSession) return;
    delete this.usersById[id];
    delete this.usersByName[userSession.name];
}

function register(id, name, ws, callback) {
    function onError(error) {
        ws.send(JSON.stringify({id:'registerResponse', response : 'rejected ', message: error}));
    }

    if (!name) {
        return onError("empty user name");
    }

    if (userRegistry.getByName(name)) {
        return onError("User " + name + " is already registered");
    }

    userRegistry.register(new UserSession(id, name, ws));
    try {
        ws.send(JSON.stringify({id: 'registerResponse', response: 'accepted'}));
    } catch(exception) {
        onError(exception);
    }
}
In order to control the media capabilities provided by the Kurento Media Server, we need an instance of the KurentoClient in the Node application server. In order to create this instance, we need to specify to the client library the location of the Kurento Media Server. In this example, we assume it’s located at localhost listening in port TCP 8888.
var kurento = require('kurento-client');

var kurentoClient = null;

var argv = minimist(process.argv.slice(2), {
    default: {
        as_uri: 'https://localhost:8443/',
        ws_uri: 'ws://localhost:8888/kurento'
    }
});

[...]

function getKurentoClient(callback) {
    if (kurentoClient !== null) {
        return callback(null, kurentoClient);
    }

    kurento(argv.ws_uri, function(error, _kurentoClient) {
        if (error) {
            console.log("Could not find media server at address " + argv.ws_uri);
            return callback("Could not find media server at address" + argv.ws_uri
                    + ". Exiting with error " + error);
        }

        kurentoClient = _kurentoClient;
        callback(null, kurentoClient);
    });
}
Once the Kurento Client has been instantiated, you are ready for communicating
with Kurento Media Server. Our first operation is to create a Media Pipeline,
then we need to create the Media Elements and connect them. In this example,
we need two WebRtcEndpoints, i.e. one peer caller and other one for the callee.
This media logic is implemented in the class CallMediaPipeline. Note that
the WebRtcEndpoints need to be connected twice, one for each media direction.
This object is created in the function incomingCallResponse which is fired
in the callee peer, after the caller executes the function call:
function call(callerId, to, from, sdpOffer) {
    clearCandidatesQueue(callerId);

    var caller = userRegistry.getById(callerId);
    var rejectCause = 'User ' + to + ' is not registered';
    if (userRegistry.getByName(to)) {
        var callee = userRegistry.getByName(to);
        caller.sdpOffer = sdpOffer
        callee.peer = from;
        caller.peer = to;
        var message = {
            id: 'incomingCall',
            from: from
        };
        try{
            return callee.sendMessage(message);
        } catch(exception) {
            rejectCause = "Error " + exception;
        }
    }
    var message  = {
        id: 'callResponse',
        response: 'rejected: ',
        message: rejectCause
    };
    caller.sendMessage(message);
}

function incomingCallResponse(calleeId, from, callResponse, calleeSdp, ws) {
    clearCandidatesQueue(calleeId);

    function onError(callerReason, calleeReason) {
        if (pipeline) pipeline.release();
        if (caller) {
            var callerMessage = {
                id: 'callResponse',
                response: 'rejected'
            }
            if (callerReason) callerMessage.message = callerReason;
            caller.sendMessage(callerMessage);
        }

        var calleeMessage = {
            id: 'stopCommunication'
        };
        if (calleeReason) calleeMessage.message = calleeReason;
        callee.sendMessage(calleeMessage);
    }

    var callee = userRegistry.getById(calleeId);
    if (!from || !userRegistry.getByName(from)) {
        return onError(null, 'unknown from = ' + from);
    }
    var caller = userRegistry.getByName(from);

    if (callResponse === 'accept') {
        var pipeline = new CallMediaPipeline();
        pipelines[caller.id] = pipeline;
        pipelines[callee.id] = pipeline;

        pipeline.createPipeline(caller.id, callee.id, ws, function(error) {
            if (error) {
                return onError(error, error);
            }

            pipeline.generateSdpAnswer(caller.id, caller.sdpOffer, function(error, callerSdpAnswer) {
                if (error) {
                    return onError(error, error);
                }

                pipeline.generateSdpAnswer(callee.id, calleeSdp, function(error, calleeSdpAnswer) {
                    if (error) {
                        return onError(error, error);
                    }

                    var message = {
                        id: 'startCommunication',
                        sdpAnswer: calleeSdpAnswer
                    };
                    callee.sendMessage(message);

                    message = {
                        id: 'callResponse',
                        response : 'accepted',
                        sdpAnswer: callerSdpAnswer
                    };
                    caller.sendMessage(message);
                });
            });
        });
    } else {
        var decline = {
            id: 'callResponse',
            response: 'rejected',
            message: 'user declined'
        };
        caller.sendMessage(decline);
    }
}
As of Kurento Media Server 6.0, the WebRTC negotiation is done by exchanging
ICE candidates between the WebRTC peers. To implement this protocol,
the webRtcEndpoint receives candidates from the client in
IceCandidateFound function. These candidates are stored in a queue when the
webRtcEndpoint is not available yet. Then these candidates are added to the
media element by calling to the addIceCandidate method.
var candidatesQueue = {};

[...]

function onIceCandidate(sessionId, _candidate) {
    var candidate = kurento.getComplexType('IceCandidate')(_candidate);
    var user = userRegistry.getById(sessionId);

    if (pipelines[user.id] && pipelines[user.id].webRtcEndpoint && pipelines[user.id].webRtcEndpoint[user.id]) {
        var webRtcEndpoint = pipelines[user.id].webRtcEndpoint[user.id];
        webRtcEndpoint.addIceCandidate(candidate);
    }
    else {
        if (!candidatesQueue[user.id]) {
            candidatesQueue[user.id] = [];
        }
        candidatesQueue[sessionId].push(candidate);
    }
}

function clearCandidatesQueue(sessionId) {
    if (candidatesQueue[sessionId]) {
        delete candidatesQueue[sessionId];
    }
}
Client-Side Logic
Let’s move now to the client-side of the application. To call the previously
created WebSocket service in the server-side, we use the JavaScript class
WebSocket. We use a specific Kurento JavaScript library called
kurento-utils.js to simplify the WebRTC interaction with the server. This
library depends on adapter.js, which is a JavaScript WebRTC utility
maintained by Google that abstracts away browser differences. Finally
jquery.js is also needed in this application. These libraries are linked in
the
index.html
web page, and are used in the
index.js.
In the following snippet we can see the creation of the WebSocket (variable
ws) in the path /one2one. Then, the onmessage listener of the
WebSocket is used to implement the JSON signaling protocol in the client-side.
Notice that there are three incoming messages to client: startResponse,
error, and iceCandidate. Convenient actions are taken to implement each
step in the communication. For example, in functions start the function
WebRtcPeer.WebRtcPeerSendrecv of kurento-utils.js is used to start a
WebRTC communication.
var ws = new WebSocket('ws://' + location.host + '/one2one');
var webRtcPeer;

[...]

ws.onmessage = function(message) {
   var parsedMessage = JSON.parse(message.data);
   console.info('Received message: ' + message.data);

   switch (parsedMessage.id) {
   case 'registerResponse':
      resgisterResponse(parsedMessage);
      break;
   case 'callResponse':
      callResponse(parsedMessage);
      break;
   case 'incomingCall':
      incomingCall(parsedMessage);
      break;
   case 'startCommunication':
      startCommunication(parsedMessage);
      break;
   case 'stopCommunication':
      console.info("Communication ended by remote peer");
      stop(true);
      break;
   case 'iceCandidate':
      webRtcPeer.addIceCandidate(parsedMessage.candidate)
      break;
   default:
      console.error('Unrecognized message', parsedMessage);
   }
}
On the one hand, the function call is executed in the caller client-side,
using the method WebRtcPeer.WebRtcPeerSendrecv of kurento-utils.js to
start a WebRTC communication in duplex mode. On the other hand, the function
incomingCall in the callee client-side uses also the method
WebRtcPeer.WebRtcPeerSendrecv of kurento-utils.js to complete the WebRTC
call.
function call() {
   if (document.getElementById('peer').value == '') {
      window.alert("You must specify the peer name");
      return;
   }

   setCallState(PROCESSING_CALL);

   showSpinner(videoInput, videoOutput);

   var options = {
      localVideo : videoInput,
      remoteVideo : videoOutput,
      onicecandidate : onIceCandidate
   }

   webRtcPeer = kurentoUtils.WebRtcPeer.WebRtcPeerSendrecv(options, function(
         error) {
      if (error) {
         console.error(error);
         setCallState(NO_CALL);
      }

      this.generateOffer(function(error, offerSdp) {
         if (error) {
            console.error(error);
            setCallState(NO_CALL);
         }
         var message = {
            id : 'call',
            from : document.getElementById('name').value,
            to : document.getElementById('peer').value,
            sdpOffer : offerSdp
         };
         sendMessage(message);
      });
   });
}

function incomingCall(message) {
   // If bussy just reject without disturbing user
   if (callState != NO_CALL) {
      var response = {
         id : 'incomingCallResponse',
         from : message.from,
         callResponse : 'reject',
         message : 'bussy'

      };
      return sendMessage(response);
   }

   setCallState(PROCESSING_CALL);
   if (confirm('User ' + message.from
         + ' is calling you. Do you accept the call?')) {
      showSpinner(videoInput, videoOutput);

      var options = {
         localVideo : videoInput,
         remoteVideo : videoOutput,
         onicecandidate : onIceCandidate
      }

      webRtcPeer = kurentoUtils.WebRtcPeer.WebRtcPeerSendrecv(options,
            function(error) {
               if (error) {
                  console.error(error);
                  setCallState(NO_CALL);
               }

               this.generateOffer(function(error, offerSdp) {
                  if (error) {
                     console.error(error);
                     setCallState(NO_CALL);
                  }
                  var response = {
                     id : 'incomingCallResponse',
                     from : message.from,
                     callResponse : 'accept',
                     sdpOffer : offerSdp
                  };
                  sendMessage(response);
               });
            });

   } else {
      var response = {
         id : 'incomingCallResponse',
         from : message.from,
         callResponse : 'reject',
         message : 'user declined'
      };
      sendMessage(response);
      stop(true);
   }
}
Dependencies
Server-side dependencies of this demo are managed using NPM. Our main dependency is the Kurento Client JavaScript (kurento-client). The relevant part of the package.json file for managing this dependency is:
"dependencies": {
   [...]
   "kurento-client" : "7.3.0"
}
At the client side, dependencies are managed using Bower. Take a look to the bower.json file and pay attention to the following section:
"dependencies": {
   [...]
   "kurento-utils" : "7.3.0"
}