
Frequently Asked Questions
Table of Contents
NAT, ICE, STUN, TURN
These are very important concepts that developers must understand well to work with WebRTC. Here is a collection of all Kurento material talking about these acronyms:
Glossary:
Installing a STUN/TURN server (Coturn):
Troubleshooting WebRTC failures
Advanced knowledge: NAT Types and NAT Traversal
When are STUN and TURN needed?
STUN (and possibly TURN) is needed for every WebRTC participant behind a NAT. All peers that try to connect from behind a NAT will need to auto-discover their own external IP address, and also open up ports for RTP data transmission, a process that is known as NAT Traversal. This is achieved by using a STUN server which must be deployed outside of the NAT.
The STUN server uses a single port for client connections (3478 by default), so this port should be opened up for the public in the server’s network configuration or Security Group. If using TURN relay, then the whole range of TURN ports (49152 to 65535 by default) should be opened up too, besides the client port. Depending on the features of the STUN/TURN server, these might be only UDP or both UDP and TCP ports. For example, Coturn uses both UDP and TCP in its default configuration.
If Kurento is behind a NAT (e.g. if your media server is protected by a NAT firewall) you must provide it with your STUN or TURN server settings. Check STUN/TURN Server Configuration for ways to configure this in Kurento. Do the same also for any WebRTC clients (like web browsers, through the iceServers field of the RTCPeerConnection constructor).
Example:
Kurento Media Server and its Application Server are running in a cloud machine without any NAT or port restriction on incoming connections, while a browser client runs from a possibly restricted NAT network that forbids incoming connections on any port that hasn’t been “opened” in advance.
The browser client may communicate with the Application Server for signaling purposes, but at the end of the day the bulk of the audio/video RTP transmission is done between the WebRTC engines of the browser and Kurento.

In scenarios like this, the client is able to send data to Kurento because its NAT will allow outgoing packets. However, Kurento will not be able to send data to the client, because the client’s NAT is closed for incoming packets. This is solved by configuring the client to use a STUN server; this server will be used by the client’s browser to open the appropriate ports in its own NAT. After this operation, the client is now able to receive audio/video streams from Kurento:
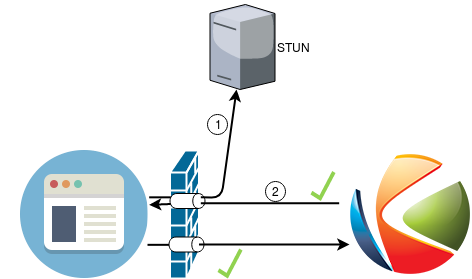
This procedure is done by the ICE implementation of the client’s browser.
Note that you can also deploy Kurento behind a NAT firewall, as long as Kurento itself is also configured to use a STUN server.
Further reading:
How does TURN work?
This is a very simplified explanation of TURN; for the complete details on how it works, read the RFC 8656 (Traversal Using Relays around NAT (TURN)).
TURN separates two network segments that cannot connect directly (otherwise, STUN and direct connections would be used). In order to allow for maximum probabilities of successful connections, TURN servers such as Coturn will enable both UDP and TCP protocols by default.
When a WebRTC participant is behind a strict NAT or firewall that requires relay, it becomes a TURN client, contacting the TURN server on its client listening port (3478 by default, either UDP or TCP), and requesting a TURN relay transport.
The TURN server listens for client requests on both UDP and TCP ports, to maximize the chances that the client’s firewall will allow the connection.
The TURN relay transport, mentioned above, is a random port selected on the TURN port range of the TURN server. This range, again, can be either UDP or TCP, to maximize the chances that remote peers are also able to send RTP data to the server.
When a remote WebRTC peer wants to send RTP data to the TURN client, it doesn’t send to it directly, instead it sends data towards the corresponding TURN relay transport of the TURN server. Then the server will relay this data through its client port (3478) towards the actual TURN client.
How to install Coturn?
Coturn is a STUN server and TURN relay, supporting all features required for the ICE protocol and allowing to establish WebRTC connections from behind a NAT.
Coturn can be installed directly from the Ubuntu package repositories:
sudo apt-get update ; sudo apt-get install --no-install-recommends \
    coturn
To configure it for WebRTC, follow these steps:
Edit
/etc/turnserver.conf.This example configuration is a good baseline; it contains the minimum setup required for using Coturn with Kurento Media Server for WebRTC:
# The external IP address of this server, if Coturn is behind a NAT.
# It must be an IP address, not a domain name.
#external-ip=<CoturnIp>

# STUN listener port for UDP and TCP.
# Default: 3478.
#listening-port=3478

# TURN lower and upper bounds of the UDP relay ports.
# Default: 49152, 65535.
#min-port=49152
#max-port=65535

# Uncomment to enable moderately verbose logs.
# Default: verbose mode OFF.
#verbose

# TURN fingerprints in messages.
fingerprint

# TURN long-term credential mechanism.
lt-cred-mech

# TURN static user account for long-term credential mechanism.
user=<TurnUser>:<TurnPassword>

# TURN realm used for the long-term credential mechanism.
realm=kurento.org

# Set the log file name.
# The log file can be reset sending a SIGHUP signal to the turnserver process.
log-file=/var/log/turn.log

# Disable log file rollover and use log file name as-is.
simple-log
Note
The external-ip is necessary in cloud providers that use internal NATs, such as AWS (Amazon EC2). Uncomment this line and write the machine’s public IP address in the field <CoturnIp>. It must be an IP address, not a domain name.
Comment out (or delete) all the TURN parameters if you only want Coturn acting as a STUN server.
Create the destination log file, otherwise Coturn will not have permissions to create the file by itself:
sudo install -o turnserver -g turnserver -m 644 /dev/null /var/log/turn.log
Other settings can be tuned as needed. For more information, check the Coturn help pages:
Main project page: https://github.com/coturn/coturn/wiki/turnserver
Fully commented configuration file: https://github.com/coturn/coturn/blob/master/examples/etc/turnserver.conf
Additional docs on configuration: https://github.com/coturn/coturn/wiki/CoturnConfig
Warning
This example configures TURN authentication with the “long-term credential” method, where you write a static username and password in the fields <TurnUser> and <TurnPassword>.
While that is good enough for showcasing the Coturn setup here, for real-world scenarios you might want to use dynamically-generated passwords. This is more secure, because each individual participant can be provided with an exclusive one-time username and password.
Coturn can be integrated with external sources, such as PostgreSQL (psql-userdb), MySQL (mysql-userdb), MongoDB (mongo-userdb), or Redis (redis-userdb), and it even provides a REST API for time-limited credentials (use-auth-secret). You can handle any of these methods from your Application Server, then use the Kurento API to dynamically provide each individual WebRtcEndpoint with the correct parameters.
Edit the file
/etc/default/coturnand uncomment or add this line:TURNSERVER_ENABLED=1
Start the Coturn system service:
sudo service coturn restart
The following ports should be open in your firewall / NAT / cloud provider’s Security Group:
listening-port (default: 3478) UDP & TCP. You can skip opening one of the protocols if you disable either UDP or TCP in Coturn (for example, with
no-tcp).All the range from min-port to max-port (default: 49152 to 65535). As per RFC 8656, this is the port range that Coturn will use by default for TURN relay. Again, you can disable either of TCP or UDP (for example, with
no-tcp-relay).
Note
Port ranges do NOT need to match between Coturn and Kurento Media Server.
If you happen to deploy both Coturn and KMS in the same machine, we recommend that their port ranges do not overlap.
Provide your STUN or TURN server settings to both Kurento Media Server and all WebRTC clients (like web browsers). Check STUN/TURN Server Configuration for ways to configure this in Kurento.
Check that your Coturn server is working. For that, follow the steps given in the next section.
How to test my STUN/TURN server?
To test if your STUN/TURN server is functioning properly, open the Trickle ICE test page. In that page, follow these steps:
Remove any server that might be filled in already by default.
Fill in your STUN/TURN server details.
To only test STUN (TURN relay will not be tested):
stun:<StunServerIp>:<StunServerPort>
To test both STUN and TURN:
turn:<TurnServerIp>:<TurnServerPort>
… and also fill in the TURN username and TURN password.
Click on Add Server. You should have only one entry in the list, with your server details.
Click on Gather candidates. Verify that you get candidates of type srflx if you are testing STUN. Likewise, you should get candidates of type srflx and type relay if you are testing TURN.
If you are missing any of the expected candidate types, your STUN/TURN server is not working well and WebRTC will fail. Check your server configuration, and your cloud provider’s network settings.
Kurento in Docker
Deploying Kurento Media Server in a container is the easiest install method, because it bundles all of the different modules and dependencies into a single, manageable unit. This makes installation and upgrades a trivial operation.
However, due to the nature of containers, it also makes configuration slightly more inconvenient, so in this section we’ll provide a heads up in Docker concepts that could be very useful for users of Kurento Docker images.
How to change config files?
To edit the configuration files used in your containers, first you’ll need the actual files; run these commands to get default ones from a temporary container:
docker create --name temp kurento/kurento-media-server:7.3.0
docker cp temp:/etc/kurento/ ./kurento-files/
docker rm temp
After editing these files as needed, provide them to newly created containers. Next sections below show examples of how to do it.
Bind mount
A bind-mount will “inject” your files from the host machine into the Kurento container. This method is the simplest one to use if you are in control of the host system:
docker run -d --name kurento --network host \
    --mount type=bind,src="$PWD/kurento-files/",dst=/etc/kurento/ \
    kurento/kurento-media-server:7.3.0
The equivalent Docker Compose file would look like this:
version: "3.8"
services:
  kms:
    image: kurento/kurento-media-server:7.3.0
    network_mode: host
    volumes:
      - type: bind
        source: ./kurento-files/
        target: /etc/kurento/
Docker volume
A volume is a storage module that can be attached to containers. This has the benefit of not depending on the host filesystem, as everything is managed by Docker.
First, use an ephemeral container to create a new volume and populate it with your config files:
docker create --name temp \
    --mount type=volume,src=kurento-volume,dst=/etc/kurento/ \
    busybox
docker cp ./kurento-files/. temp:/etc/kurento/
docker rm temp
Then run your container as usual, mounting the volume in the appropriate path:
docker run -d --name kurento --network host \
    --mount type=volume,src=kurento-volume,dst=/etc/kurento/ \
    kurento/kurento-media-server:7.3.0
The equivalent Docker Compose file would look like this:
version: "3.8"
services:
  kms:
    image: kurento/kurento-media-server:7.3.0
    network_mode: host
    volumes:
      - type: volume
        source: kurento-volume
        target: /etc/kurento/
FROM image
Creating your own fully customized, self-contained image is a good choice to avoid that your containers depend on files stored in the host machine: The FROM feature of Dockerfiles can be used to derive directly from the official Kurento Docker image.
A Dockerfile such as this one would be a good enough starting point:
FROM kurento/kurento-media-server:7.3.0
COPY ./kurento-files /etc/kurento
Now, build the new image:
$ docker build --tag kurento-media-server-custom .
Step 1/2 : FROM kurento/kurento-media-server:7.3.0
Step 2/2 : COPY ./kurento-files /etc/kurento
Successfully built 3d2bedb31a9d
Successfully tagged kurento-media-server-custom
And use your new image “kurento-media-server-custom” in place of the original one.
Where are my recordings?
A frequent question, by users who are new to Docker, is where the RecorderEndpoint files are being stored, because they don’t show up anywhere in the host file system. The answer is that KMS is recording files inside the container’s local storage, in the path defined by the RecorderEndpoint constructor (Java, JavaScript).
In general, running a Docker container won’t modify your host system and won’t create new files in it, at least by default. This is an integral part of how Docker containers work. To get those files out, you should use the mechanisms that Docker offers, like for example a bind-mount to the recording path.
Media Pipeline
These questions relate to the concept of Media Pipeline in Kurento, touching topics about architecture or performance.
How many simultaneous participants are supported?
This depends entirely on the performance of the machine where Kurento Media Server is running. The best thing you can do is performing an actual load test under your particular conditions.
The folks working on OpenVidu (a WebRTC platform based on Kurento) conducted a study that you might find interesting:
How many Media Pipelines do I need for my Application?
A Pipeline is a top-level container that handles every resource that should be able to achieve any kind of interaction with each other. A Media Element can only communicate when they are part of the same Pipeline. Different Pipelines in the server are independent and isolated, so they do not share audio, video, data or events.
99% times, this translates to using 1 Pipeline object for each “room”-like videoconference. It doesn’t matter if there is 1 single presenter and N viewers (“one-to-many”), or if there are N participants Skype-style (“many-to-many”), all of them are managed by the same Pipeline. So, most actual real-world applications would only ever create 1 Pipeline, because that’s good enough for most needs.
A good heuristic is that you will need one Pipeline per each set of communicating partners in a channel, and one Endpoint in this Pipeline per audio/video streams exchanged with a participant.
How many Endpoints do I need?
Your application will need to create at least one Endpoint for each media stream flowing to (or from) each participant. You might actually need more, if the streams are to be recorded or if streams are being duplicated for other purposes.
Which participant corresponds to which Endpoint?
The Kurento API offers no way to get application-level semantic attributes stored in a Media Element. However, the application developer can maintain a HashMap or equivalent data structure, storing the Endpoint identifiers (which are plain strings) to whatever application information is desired, such as the names of the participants.
How to get existing objects from the Media Server?
The usual workflow for an Application Server is to connect with the Media Server, and use RPC methods to create new MediaPipelines and Endpoints inside it. However, if you want to connect your Application Server with objects that already exist in the Media Server (as opposed to creating new ones), you can achieve it by querying by their ID. This is done with the “describe” method of the JSON-RPC API, as described in Kurento Protocol.
Client API:
Java: KurentoClient.getById.
JavaScript: KurentoClient.getMediaobjectById.