
Java - Advanced One to one video call
This web application consists of an advanced one to one video call using WebRTC technology. It is an improved version of the one 2 one call tutorial).
Note
Web browsers require using HTTPS to enable WebRTC, so the web server must use SSL and a certificate file. For instructions, check Configure a Java server to use HTTPS.
For convenience, this tutorial already provides dummy self-signed certificates (which will cause a security warning in the browser).
For the impatient: running this example
First of all, you should install Kurento Media Server to run this demo. Please visit the installation guide for further information.
To launch the application, you need to clone the GitHub project where this demo is hosted, and then run the main class:
git clone https://github.com/Kurento/kurento.git
cd kurento/tutorials/java/one2one-call-advanced/
git checkout main
mvn -U clean spring-boot:run
The web application starts on port 8443 in the localhost by default. Therefore, open the URL https://localhost:8443/ in a WebRTC compliant browser (Chrome, Firefox).
Note
These instructions work only if Kurento Media Server is up and running in the same machine
as the tutorial. However, it is possible to connect to a remote KMS in other machine, simply adding
the flag kms.url to the JVM executing the demo. As we’ll be using maven, you should execute
the following command
mvn -U clean spring-boot:run \
    -Dspring-boot.run.jvmArguments="-Dkms.url=ws://{KMS_HOST}:8888/kurento"
Understanding this example
This application incorporates the recording capability provided by the Kurento Media Server in a one to one video communication. In addition, a filter element (FaceOverlayFilter) is placed between the WebRtcEndpoints of the Media Pipeline. The following picture shows a screenshot of this demo running in a web browser:
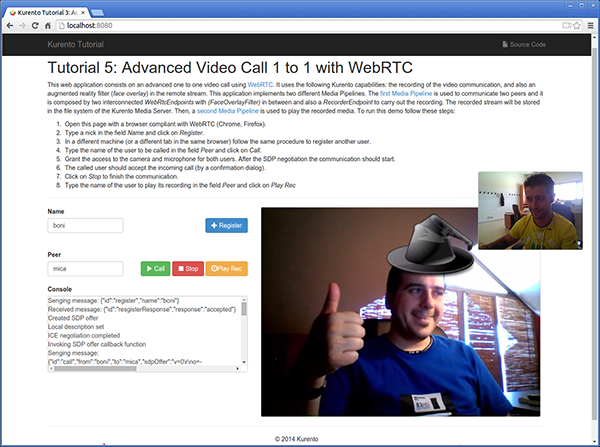
Advanced one to one video call screenshot
The interface of the application (an HTML web page) is composed by two HTML5 video tags: one for the local video camera stream (the caller stream, the smaller video in the picture) and other for the remote peer in the call (the callee stream, the bigger video in the picture). If two users, A and B, are using the application, the media flow goes this way: The video camera stream of user A is sent to the Kurento Media Server and sent again to the user B. On the other hand, user B sends its video camera stream to Kurento and then it is sent to user A.
This application is implemented by means of two Media Pipeline ‘s. First, the rich real-time WebRTC communication is performed two WebRtcEndpoints interconnected, and with a FaceOverlayFilter in between them. In addition and a RecorderEndpoint is used to store both streams in the file system of the Kurento Media Server. This media pipeline is illustrated in the following picture:
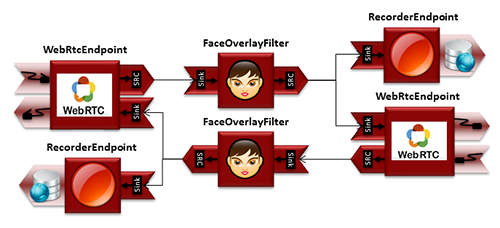
Advanced one to one video call media pipeline (1)
A second media pipeline is needed to play the previously recorded media. This pipeline is composed by a PlayerEndpoint which reads the files stored in the Kurento Media Server. This media element injects the media in a WebRtcEndpoint which is charge to transport the media to the HTML5 video tag in the browser:
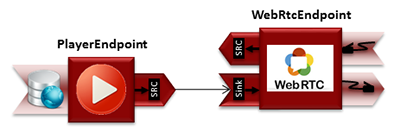
Advanced one to one video call media pipeline (2)
Note
The playback of a static file can be done in several ways. In addition to this media pipeline (PlayerEndpoint -> WebRtcEndpoint) the recorded file could be served directly by an HTTP server.
To communicate the client with the server to manage calls we have designed a signaling protocol based on JSON messages over WebSocket ‘s. The normal sequence between client and server would be as follows:
User A is registered in the server with his name
User B is registered in the server with her name
User A wants to call to User B
User B accepts the incoming call
The communication is established and media is flowing between User A and User B
One of the users finishes the video communication
One of the users play the recorded media
This is very simple protocol designed to show a simple one to one call application implemented with Kurento. In a professional application it can be improved, for example implementing seeking user, ordered finish, among other functions.
Assuming that User A is using Client A and User B is using Client B, we can draw the following sequence diagram with detailed messages between clients and server. The following diagram shows the two parts of the signaling protocol: first the enhanced real-time communication is performed, and then the playback of the recorded file is carried out.
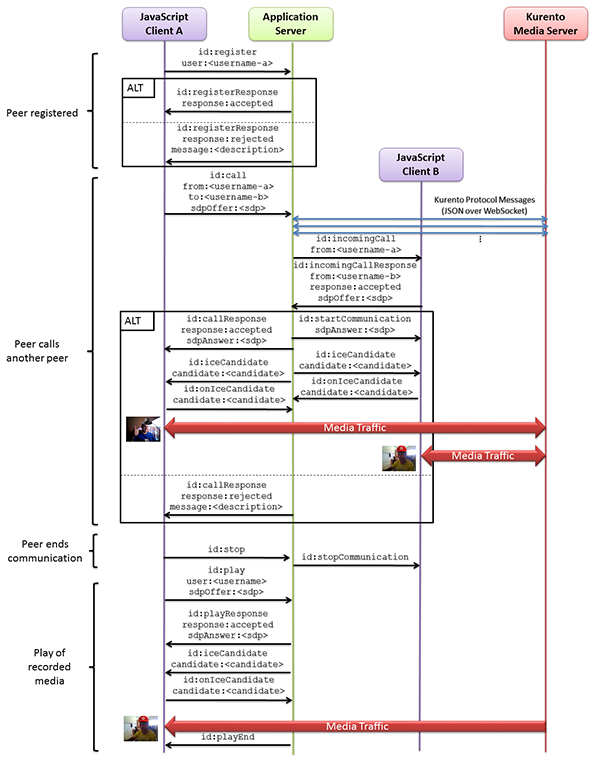
Advanced one to one video call signaling protocol
As you can see in the diagram, SDP and ICE candidates need to be interchanged between client and server to establish the WebRTC connection between the Kurento client and server. Specifically, the SDP negotiation connects the WebRtcPeer in the browser with the WebRtcEndpoint in the server.
The following sections describe in detail the server-side, the client-side, and how to run the demo. The complete source code of this demo can be found in GitHub.
Application Server Logic
As in the Magic Mirror tutorial, this demo has been developed using Java and Spring Boot.
Note
You can use whatever Java server side technology you prefer to build web applications with Kurento. For example, a pure Java EE application, SIP Servlets, Play, Vert.x, etc. We have choose Spring Boot for convenience.
In the following figure you can see a class diagram of the server side code:
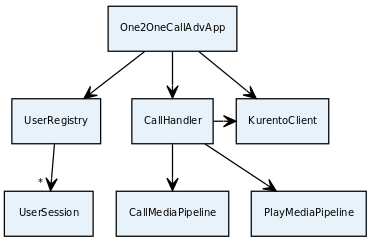
Server-side class diagram of the advanced one to one video call app
The main class of this demo is named
One2OneCallAdvApp.
As you can see, the KurentoClient is instantiated in this class as a Spring
Bean.
@EnableWebSocket
@SpringBootApplication
public class One2OneCallAdvApp implements WebSocketConfigurer {

   final static String DEFAULT_APP_SERVER_URL = "https://localhost:8443";

   @Bean
   public CallHandler callHandler() {
      return new CallHandler();
   }

   @Bean
   public UserRegistry registry() {
      return new UserRegistry();
   }

   @Bean
   public KurentoClient kurentoClient() {
      return KurentoClient.create();
   }

   public void registerWebSocketHandlers(WebSocketHandlerRegistry registry) {
      registry.addHandler(callHandler(), "/call");
   }

   public static void main(String[] args) throws Exception {
      new SpringApplication(One2OneCallAdvApp.class).run(args);
   }

}
This web application follows a Single Page Application architecture
(SPA), and uses a WebSocket to communicate client with server
by means of requests and responses. Specifically, the main app class implements
the interface WebSocketConfigurer to register a WebSocketHandler to
process WebSocket requests in the path /call.
CallHandler
class implements TextWebSocketHandler to handle text WebSocket requests.
The central piece of this class is the method handleTextMessage. This
method implements the actions for requests, returning responses through the
WebSocket. In other words, it implements the server part of the signaling
protocol depicted in the previous sequence diagram.
In the designed protocol there are five different kind of incoming messages to
the Server : register, call, incomingCallResponse,
onIceCandidate and play. These messages are treated in the switch
clause, taking the proper steps in each case.
public class CallHandler extends TextWebSocketHandler {

   private static final Logger log = LoggerFactory
         .getLogger(CallHandler.class);
   private static final Gson gson = new GsonBuilder().create();

   private final ConcurrentHashMap<String, MediaPipeline> pipelines = new ConcurrentHashMap<String, MediaPipeline>();

   @Autowired
   private KurentoClient kurento;

   @Autowired
   private UserRegistry registry;

   @Override
   public void handleTextMessage(WebSocketSession session, TextMessage message)
         throws Exception {
      JsonObject jsonMessage = gson.fromJson(message.getPayload(),
            JsonObject.class);
      UserSession user = registry.getBySession(session);

      if (user != null) {
         log.debug("Incoming message from user '{}': {}", user.getName(),
               jsonMessage);
      } else {
         log.debug("Incoming message from new user: {}", jsonMessage);
      }

      switch (jsonMessage.get("id").getAsString()) {
      case "register":
         register(session, jsonMessage);
         break;
      case "call":
         call(user, jsonMessage);
         break;
      case "incomingCallResponse":
         incomingCallResponse(user, jsonMessage);
         break;
      case "play":
         play(user, jsonMessage);
         break;
      case "onIceCandidate": {
         JsonObject candidate = jsonMessage.get("candidate")
               .getAsJsonObject();

         if (user != null) {
            IceCandidate cand = new IceCandidate(candidate.get("candidate")
                  .getAsString(), candidate.get("sdpMid").getAsString(),
                  candidate.get("sdpMLineIndex").getAsInt());
            user.addCandidate(cand);
         }
         break;
      }
      case "stop":
         stop(session);
         releasePipeline(user);
      case "stopPlay":
         releasePipeline(user);
      default:
         break;
      }
   }

   private void register(WebSocketSession session, JsonObject jsonMessage)
         throws IOException {
      ...
   }

   private void call(UserSession caller, JsonObject jsonMessage)
         throws IOException {
      ...
   }

   private void incomingCallResponse(final UserSession callee,
         JsonObject jsonMessage) throws IOException {
      ...
   }

   public void stop(WebSocketSession session) throws IOException {
      ...
   }

   public void releasePipeline(UserSession session) throws IOException {
      ...
   }

   private void play(final UserSession session, JsonObject jsonMessage)
         throws IOException {
      ...
   }

   @Override
   public void afterConnectionClosed(WebSocketSession session,
         CloseStatus status) throws Exception {
      stop(session);
      registry.removeBySession(session);
   }

}
In the following snippet, we can see the register method. Basically, it
obtains the name attribute from register message and check if there are
a registered user with that name. If not, the new user is registered and an
acceptance message is sent to it.
private void register(WebSocketSession session, JsonObject jsonMessage)
      throws IOException {
   String name = jsonMessage.getAsJsonPrimitive("name").getAsString();

   UserSession caller = new UserSession(session, name);
   String responseMsg = "accepted";
   if (name.isEmpty()) {
      responseMsg = "rejected: empty user name";
   } else if (registry.exists(name)) {
      responseMsg = "rejected: user '" + name + "' already registered";
   } else {
      registry.register(caller);
   }

   JsonObject response = new JsonObject();
   response.addProperty("id", "resgisterResponse");
   response.addProperty("response", responseMsg);
   caller.sendMessage(response);
}
In the call method, the server checks if there are a registered user with
the name specified in to message attribute and send an incomingCall
message to it. Or, if there isn’t any user with that name, a callResponse
message is sent to caller rejecting the call.
private void call(UserSession caller, JsonObject jsonMessage)
      throws IOException {
   String to = jsonMessage.get("to").getAsString();
   String from = jsonMessage.get("from").getAsString();
   JsonObject response = new JsonObject();

   if (registry.exists(to)) {
      UserSession callee = registry.getByName(to);
      caller.setSdpOffer(jsonMessage.getAsJsonPrimitive("sdpOffer")
            .getAsString());
      caller.setCallingTo(to);

      response.addProperty("id", "incomingCall");
      response.addProperty("from", from);

      callee.sendMessage(response);
      callee.setCallingFrom(from);
   } else {
      response.addProperty("id", "callResponse");
      response.addProperty("response", "rejected");
      response.addProperty("message", "user '" + to
            + "' is not registered");

      caller.sendMessage(response);
   }
}
In the incomingCallResponse method, if the callee user accepts the call, it
is established and the media elements are created to connect the caller with
the callee. Basically, the server creates a CallMediaPipeline object, to
encapsulate the media pipeline creation and management. Then, this object is
used to negotiate media interchange with user’s browsers.
As explained in the
Magic Mirror tutorial, the
negotiation between WebRTC peer in the browser and WebRtcEndpoint in Kurento
Server is made by means of SDP generation at the client (offer) and SDP
generation at the server (answer). The SDP answers are generated with the
Kurento Java Client inside the class CallMediaPipeline (as we see in a
moment). The methods used to generate SDP are
generateSdpAnswerForCallee(calleeSdpOffer) and
generateSdpAnswerForCaller(callerSdpOffer):
private void incomingCallResponse(final UserSession callee,
      JsonObject jsonMessage) throws IOException {
   String callResponse = jsonMessage.get("callResponse").getAsString();
   String from = jsonMessage.get("from").getAsString();
   final UserSession calleer = registry.getByName(from);
   String to = calleer.getCallingTo();

   if ("accept".equals(callResponse)) {
      log.debug("Accepted call from '{}' to '{}'", from, to);

      CallMediaPipeline callMediaPipeline = new CallMediaPipeline(
            kurento, from, to);
      pipelines.put(calleer.getSessionId(),
            callMediaPipeline.getPipeline());
      pipelines.put(callee.getSessionId(),
            callMediaPipeline.getPipeline());

      String calleeSdpOffer = jsonMessage.get("sdpOffer").getAsString();
      String calleeSdpAnswer = callMediaPipeline
            .generateSdpAnswerForCallee(calleeSdpOffer);

      callee.setWebRtcEndpoint(callMediaPipeline.getCalleeWebRtcEP());
      callMediaPipeline.getCalleeWebRtcEP().addIceCandidateFoundListener(
            new EventListener<IceCandidateFoundEvent>() {

               @Override
               public void onEvent(IceCandidateFoundEvent event) {
                  JsonObject response = new JsonObject();
                  response.addProperty("id", "iceCandidate");
                  response.add("candidate", JsonUtils
                        .toJsonObject(event.getCandidate()));
                  try {
                     synchronized (callee.getSession()) {
                        callee.getSession()
                              .sendMessage(
                                    new TextMessage(response
                                          .toString()));
                     }
                  } catch (IOException e) {
                     log.debug(e.getMessage());
                  }
               }
            });

      JsonObject startCommunication = new JsonObject();
      startCommunication.addProperty("id", "startCommunication");
      startCommunication.addProperty("sdpAnswer", calleeSdpAnswer);

      synchronized (callee) {
         callee.sendMessage(startCommunication);
      }

      callMediaPipeline.getCalleeWebRtcEP().gatherCandidates();

      String callerSdpOffer = registry.getByName(from).getSdpOffer();

      calleer.setWebRtcEndpoint(callMediaPipeline.getCallerWebRtcEP());
      callMediaPipeline.getCallerWebRtcEP().addIceCandidateFoundListener(
            new EventListener<IceCandidateFoundEvent>() {

               @Override
               public void onEvent(IceCandidateFoundEvent event) {
                  JsonObject response = new JsonObject();
                  response.addProperty("id", "iceCandidate");
                  response.add("candidate", JsonUtils
                        .toJsonObject(event.getCandidate()));
                  try {
                     synchronized (calleer.getSession()) {
                        calleer.getSession()
                              .sendMessage(
                                    new TextMessage(response
                                          .toString()));
                     }
                  } catch (IOException e) {
                     log.debug(e.getMessage());
                  }
               }
            });

      String callerSdpAnswer = callMediaPipeline
            .generateSdpAnswerForCaller(callerSdpOffer);

      JsonObject response = new JsonObject();
      response.addProperty("id", "callResponse");
      response.addProperty("response", "accepted");
      response.addProperty("sdpAnswer", callerSdpAnswer);

      synchronized (calleer) {
         calleer.sendMessage(response);
      }

      callMediaPipeline.getCallerWebRtcEP().gatherCandidates();

      callMediaPipeline.record();

   } else {
      JsonObject response = new JsonObject();
      response.addProperty("id", "callResponse");
      response.addProperty("response", "rejected");
      calleer.sendMessage(response);
   }
}
Finally, the play method instantiates a PlayMediaPipeline object, which
is used to create Media Pipeline in charge of the playback of the recorded
streams in the Kurento Media Server.
private void play(final UserSession session, JsonObject jsonMessage)
      throws IOException {
   String user = jsonMessage.get("user").getAsString();
   log.debug("Playing recorded call of user '{}'", user);

   JsonObject response = new JsonObject();
   response.addProperty("id", "playResponse");

   if (registry.getByName(user) != null
         && registry.getBySession(session.getSession()) != null) {
      final PlayMediaPipeline playMediaPipeline = new PlayMediaPipeline(
            kurento, user, session.getSession());
      String sdpOffer = jsonMessage.get("sdpOffer").getAsString();

      session.setPlayingWebRtcEndpoint(playMediaPipeline.getWebRtc());

      playMediaPipeline.getPlayer().addEndOfStreamListener(
            new EventListener<EndOfStreamEvent>() {
               @Override
               public void onEvent(EndOfStreamEvent event) {
                  UserSession user = registry
                        .getBySession(session.getSession());
                  releasePipeline(user);
                  playMediaPipeline.sendPlayEnd(session.getSession());
               }
            });

      playMediaPipeline.getWebRtc().addIceCandidateFoundListener(
            new EventListener<IceCandidateFoundEvent>() {

               @Override
               public void onEvent(IceCandidateFoundEvent event) {
                  JsonObject response = new JsonObject();
                  response.addProperty("id", "iceCandidate");
                  response.add("candidate", JsonUtils
                        .toJsonObject(event.getCandidate()));
                  try {
                     synchronized (session) {
                        session.getSession()
                              .sendMessage(
                                    new TextMessage(response
                                          .toString()));
                     }
                  } catch (IOException e) {
                     log.debug(e.getMessage());
                  }
               }
            });

      String sdpAnswer = playMediaPipeline.generateSdpAnswer(sdpOffer);

      response.addProperty("response", "accepted");

      response.addProperty("sdpAnswer", sdpAnswer);

      playMediaPipeline.play();
      pipelines.put(session.getSessionId(),
            playMediaPipeline.getPipeline());
      synchronized (session.getSession()) {
         session.sendMessage(response);
      }

      playMediaPipeline.getWebRtc().gatherCandidates();

   } else {
      response.addProperty("response", "rejected");
      response.addProperty("error", "No recording for user '" + user
            + "'. Please type a correct user in the 'Peer' field.");
      session.getSession().sendMessage(
            new TextMessage(response.toString()));
   }
}
The media logic in this demo is implemented in the classes
CallMediaPipeline
and
PlayMediaPipeline.
The first media pipeline consists of two WebRtcEndpoint elements
interconnected with a FaceOverlayFilter in between, and also with and
RecorderEndpoint to carry out the recording of the WebRTC communication.
Please take note that the WebRtc endpoints needs to be connected twice, one for
each media direction. In this class we can see the implementation of methods
generateSdpAnswerForCaller and generateSdpAnswerForCallee. These
methods delegate to WebRtc endpoints to create the appropriate answer.
public class CallMediaPipeline {

   private static final SimpleDateFormat df = new SimpleDateFormat(
         "yyyy-MM-dd_HH-mm-ss-S");
   public static final String RECORDING_PATH = "file:///tmp/"
         + df.format(new Date()) + "-";
   public static final String RECORDING_EXT = ".webm";

   private final MediaPipeline pipeline;
   private final WebRtcEndpoint webRtcCaller;
   private final WebRtcEndpoint webRtcCallee;
   private final RecorderEndpoint recorderCaller;
   private final RecorderEndpoint recorderCallee;

   public CallMediaPipeline(KurentoClient kurento, String from, String to) {

      // Media pipeline
      pipeline = kurento.createMediaPipeline();

      // Media Elements (WebRtcEndpoint, RecorderEndpoint, FaceOverlayFilter)
      webRtcCaller = new WebRtcEndpoint.Builder(pipeline).build();
      webRtcCallee = new WebRtcEndpoint.Builder(pipeline).build();

      recorderCaller = new RecorderEndpoint.Builder(pipeline, RECORDING_PATH
            + from + RECORDING_EXT).build();
      recorderCallee = new RecorderEndpoint.Builder(pipeline, RECORDING_PATH
            + to + RECORDING_EXT).build();

      String appServerUrl = System.getProperty("app.server.url",
            One2OneCallAdvApp.DEFAULT_APP_SERVER_URL);
      FaceOverlayFilter faceOverlayFilterCaller = new FaceOverlayFilter.Builder(
            pipeline).build();
      faceOverlayFilterCaller.setOverlayedImage(appServerUrl
            + "/img/mario-wings.png", -0.35F, -1.2F, 1.6F, 1.6F);

      FaceOverlayFilter faceOverlayFilterCallee = new FaceOverlayFilter.Builder(
            pipeline).build();
      faceOverlayFilterCallee.setOverlayedImage(
            appServerUrl + "/img/Hat.png", -0.2F, -1.35F, 1.5F, 1.5F);

      // Connections
      webRtcCaller.connect(faceOverlayFilterCaller);
      faceOverlayFilterCaller.connect(webRtcCallee);
      faceOverlayFilterCaller.connect(recorderCaller);

      webRtcCallee.connect(faceOverlayFilterCallee);
      faceOverlayFilterCallee.connect(webRtcCaller);
      faceOverlayFilterCallee.connect(recorderCallee);
   }

   public void record() {
      recorderCaller.record();
      recorderCallee.record();
   }

   public String generateSdpAnswerForCaller(String sdpOffer) {
      return webRtcCaller.processOffer(sdpOffer);
   }

   public String generateSdpAnswerForCallee(String sdpOffer) {
      return webRtcCallee.processOffer(sdpOffer);
   }

   public MediaPipeline getPipeline() {
      return pipeline;
   }

   public WebRtcEndpoint getCallerWebRtcEP() {
      return webRtcCaller;
   }

   public WebRtcEndpoint getCalleeWebRtcEP() {
      return webRtcCallee;
   }
}
Note
Notice the hat URLs are provided by the application server and consumed by the KMS. This logic is assuming
that the application server is hosted in local (localhost), and by the default the hat URLs are
https://localhost:8443/img/mario-wings.png and https://localhost:8443/img/Hat.png. If your application server
is hosted in a different host, it can be easily changed by means of the configuration parameter app.server.url,
for example:
mvn -U clean spring-boot:run -Dapp.server.url=https://app_server_host:app_server_port
The second media pipeline consists of a PlayerEndpoint connected to a
WebRtcEndpoint. The PlayerEndpoint reads the previously recorded media
in the file system of the Kurento Media Server. The WebRtcEndpoint is used
in receive-only mode.
public class PlayMediaPipeline {

   private static final Logger log = LoggerFactory
         .getLogger(PlayMediaPipeline.class);

   private WebRtcEndpoint webRtc;
   private PlayerEndpoint player;

   public PlayMediaPipeline(KurentoClient kurento, String user,
         final WebSocketSession session) {
      // Media pipeline
      MediaPipeline pipeline = kurento.createMediaPipeline();

      // Media Elements (WebRtcEndpoint, PlayerEndpoint)
      webRtc = new WebRtcEndpoint.Builder(pipeline).build();
      player = new PlayerEndpoint.Builder(pipeline, RECORDING_PATH + user
            + RECORDING_EXT).build();

      // Connection
      player.connect(webRtc);

      // Player listeners
      player.addErrorListener(new EventListener<ErrorEvent>() {
         @Override
         public void onEvent(ErrorEvent event) {
            log.info("ErrorEvent: {}", event.getDescription());
            sendPlayEnd(session);
         }
      });
   }

   public void sendPlayEnd(WebSocketSession session) {
      try {
         JsonObject response = new JsonObject();
         response.addProperty("id", "playEnd");
         session.sendMessage(new TextMessage(response.toString()));
      } catch (IOException e) {
         log.error("Error sending playEndOfStream message", e);
      }
   }

   public void play() {
      player.play();
   }

   public String generateSdpAnswer(String sdpOffer) {
      return webRtc.processOffer(sdpOffer);
   }

   public MediaPipeline getPipeline() {
      return pipeline;
   }

   public WebRtcEndpoint getWebRtc() {
      return webRtc;
   }

   public PlayerEndpoint getPlayer() {
      return player;
   }

}
Client-Side
Let’s move now to the client-side of the application. To call the previously
created WebSocket service in the server-side, we use the JavaScript class
WebSocket. We use a specific Kurento JavaScript library called
kurento-utils.js to simplify the WebRTC interaction with the server. This
library depends on adapter.js, which is a JavaScript WebRTC utility
maintained by Google that abstracts away browser differences. Finally
jquery.js is also needed in this application.
These libraries are linked in the index.html web page, and are used in the index.js.
In the following snippet we can see the creation of the WebSocket (variable
ws) in the path /call. Then, the onmessage listener of the
WebSocket is used to implement the JSON signaling protocol in the client-side.
Notice that there are six incoming messages to client: resgisterResponse,
callResponse, incomingCall, startCommunication, iceCandidate
and play. Convenient actions are taken to implement each step in the
communication. On the one hand, in functions call and incomingCall (for
caller and callee respectively), the function WebRtcPeer.WebRtcPeerSendrecv
of kurento-utils.js is used to start a WebRTC communication. On the other
hand in the function play, the function WebRtcPeer.WebRtcPeerRecvonly
is called since the WebRtcEndpoint is used in receive-only.
var ws = new WebSocket('ws://' + location.host + '/call');

ws.onmessage = function(message) {
   var parsedMessage = JSON.parse(message.data);
   console.info('Received message: ' + message.data);

   switch (parsedMessage.id) {
   case 'resgisterResponse':
      resgisterResponse(parsedMessage);
      break;
   case 'callResponse':
      callResponse(parsedMessage);
      break;
   case 'incomingCall':
      incomingCall(parsedMessage);
      break;
   case 'startCommunication':
      startCommunication(parsedMessage);
      break;
   case 'stopCommunication':
      console.info("Communication ended by remote peer");
      stop(true);
      break;
   case 'playResponse':
      playResponse(parsedMessage);
      break;
   case 'playEnd':
      playEnd();
      break;
   case 'iceCandidate':
       webRtcPeer.addIceCandidate(parsedMessage.candidate, function (error) {
        if (!error) return;
         console.error("Error adding candidate: " + error);
       });
       break;
   default:
      console.error('Unrecognized message', parsedMessage);
   }
}

function incomingCall(message) {
   // If bussy just reject without disturbing user
   if (callState != NO_CALL && callState != POST_CALL) {
      var response = {
         id : 'incomingCallResponse',
         from : message.from,
         callResponse : 'reject',
         message : 'bussy'
      };
      return sendMessage(response);
   }

   setCallState(DISABLED);
   if (confirm('User ' + message.from
         + ' is calling you. Do you accept the call?')) {
      showSpinner(videoInput, videoOutput);

      from = message.from;
      var options = {
               localVideo: videoInput,
               remoteVideo: videoOutput,
               onicecandidate: onIceCandidate
             }
       webRtcPeer = new kurentoUtils.WebRtcPeer.WebRtcPeerSendrecv(options,
         function (error) {
           if(error) {
              return console.error(error);
           }
           this.generateOffer (onOfferIncomingCall);
         });
   } else {
      var response = {
         id : 'incomingCallResponse',
         from : message.from,
         callResponse : 'reject',
         message : 'user declined'
      };
      sendMessage(response);
      stop();
   }
}

function call() {
   if (document.getElementById('peer').value == '') {
      document.getElementById('peer').focus();
      window.alert("You must specify the peer name");
      return;
   }
   setCallState(DISABLED);
   showSpinner(videoInput, videoOutput);

   var options = {
            localVideo: videoInput,
            remoteVideo: videoOutput,
            onicecandidate: onIceCandidate
          }
   webRtcPeer = new kurentoUtils.WebRtcPeer.WebRtcPeerSendrecv(options,
      function (error) {
        if(error) {
           return console.error(error);
        }
        this.generateOffer (onOfferCall);
   });
}

function play() {
   var peer = document.getElementById('peer').value;
   if (peer == '') {
      window.alert("You must insert the name of the user recording to be played (field 'Peer')");
      document.getElementById('peer').focus();
      return;
   }

   document.getElementById('videoSmall').style.display = 'none';
   setCallState(DISABLED);
   showSpinner(videoOutput);

   var options = {
            remoteVideo: videoOutput,
            onicecandidate: onIceCandidate
          }
   webRtcPeer = new kurentoUtils.WebRtcPeer.WebRtcPeerRecvonly(options,
      function (error) {
        if(error) {
           return console.error(error);
        }
        this.generateOffer (onOfferPlay);
   });
}

function stop(message) {
   var stopMessageId = (callState == IN_CALL) ? 'stop' : 'stopPlay';
   setCallState(POST_CALL);
   if (webRtcPeer) {
      webRtcPeer.dispose();
      webRtcPeer = null;

      if (!message) {
         var message = {
            id : stopMessageId
         }
         sendMessage(message);
      }
   }
   hideSpinner(videoInput, videoOutput);
   document.getElementById('videoSmall').style.display = 'block';
}
Dependencies
This Java Spring application is implemented using Maven. The relevant part of the pom.xml is where Kurento dependencies are declared. As the following snippet shows, we need two dependencies: the Kurento Client Java dependency (kurento-client) and the JavaScript Kurento utility library (kurento-utils) for the client-side. Other client libraries are managed with webjars:
<dependencies>
   <dependency>
      <groupId>org.kurento</groupId>
      <artifactId>kurento-client</artifactId>
   </dependency>
   <dependency>
      <groupId>org.kurento</groupId>
      <artifactId>kurento-utils-js</artifactId>
   </dependency>
   <dependency>
      <groupId>org.webjars</groupId>
      <artifactId>webjars-locator</artifactId>
   </dependency>
   <dependency>
      <groupId>org.webjars.bower</groupId>
      <artifactId>bootstrap</artifactId>
   </dependency>
   <dependency>
      <groupId>org.webjars.bower</groupId>
      <artifactId>demo-console</artifactId>
   </dependency>
   <dependency>
      <groupId>org.webjars.bower</groupId>
      <artifactId>draggabilly</artifactId>
   </dependency>
   <dependency>
      <groupId>org.webjars.bower</groupId>
      <artifactId>adapter.js</artifactId>
   </dependency>
   <dependency>
      <groupId>org.webjars.bower</groupId>
      <artifactId>jquery</artifactId>
   </dependency>
   <dependency>
      <groupId>org.webjars.bower</groupId>
      <artifactId>ekko-lightbox</artifactId>
   </dependency>
</dependencies>
Note
You can find the latest version of Kurento Java Client at Maven Central.