
Writing Kurento Modules
Table of Contents
Scaffolding and development
You can develop your own modules to expand the features of Kurento Media Server. There are two main flavors of Kurento modules:
Modules based on OpenCV. These are recommended if you would like to add features such as Computer Vision or Augmented Reality.
Modules based on GStreamer. This kind of modules provide a generic entry point for media processing within the GStreamer framework. Such modules are more powerful, but also they are more difficult to develop. It is necessary to have good knowledge of GStreamer development.
The starting point to develop a filter is to create a basic structure for the source code, what we’ll call the scaffolding. This is done with the kurento-module-scaffold tool, which comes included with the kurento-media-server-dev package. To install it, run this command:
sudo apt-get update ; sudo apt-get install --no-install-recommends \
    kurento-media-server-dev
Now use the scaffold tool to generate code for your new module:
kurento-module-scaffold <Prefix> <CamelCaseName> <snake_case_name> [IsOpenCV? true|false]
<Prefix> should be an UpperCamelCase word that serves as an application- or library-specific namespace prefix in order to avoid name conflicts in case a similar plugin with the same name ever gets added to GStreamer. If an empty string (“”) is given, then Gst will be used by default.
<CamelCaseName> and <snake_case_name> are the name of the new module, in UpperCamelCase (also known as PascalCase) and snake_case, respectively.
For example:
For an OpenCV module:
kurento-module-scaffold App OpenCVModule opencv-module true
For a GStreamer module:
kurento-module-scaffold App VideoModule video-module false
The scaffolding tool generates a complete folder tree, with all the needed CMakeLists.txt files to build with CMake. You’ll also find empty Kurento Module Descriptor files (*.kmd.json), which must contain a complete description of the module: constructor, methods, properties, events, and the complex types defined by the developer.
Once your .kmd files have been filled with a complete description of the module, it is time to generate the corresponding server stub code with kurento-module-creator. Change to the root directory of your module and run CMake:
cd video-module/

mkdir build/ ; cd build/
cmake ..
make
If working with a GStreamer module, now you can verify that the new module is successfully loaded by GStreamer, with these commands:
# To check if the plugin is found and loaded:
GST_PLUGIN_PATH="$PWD" gst-inspect-1.0 | grep -i appvideomodule

# To inspect all metadata exported by the plugin:
GST_PLUGIN_PATH="$PWD" gst-inspect-1.0 appvideomodule

# To test the plugin directly with some video input
# (this is just a sample for raw video; adapt as necessary!)
GST_PLUGIN_PATH="$PWD" gst-launch-1.0 \
    uridecodebin uri='file:///path/to/video.mp4' ! videoconvert \
    ! appvideomodule \
    ! videoconvert ! autovideosink
Note that in this example appvideomodule is the GStreamer name of your module.
The following sections detail how to create your module, depending on the filter type you chose (OpenCV or GStreamer).
OpenCV module
There are several files in src/server/implementation/objects/:
{Name}Impl.cpp
{Name}Impl.hpp
{Name}OpenCVImpl.cpp
{Name}OpenCVImpl.hpp
The first two files contain the server-side implementation of the JSON-RPC API, and normally you won’t need to modify them. The last two files will contain the logic of your module.
The file {Name}OpenCVImpl.cpp contains functions to deal with the methods and the parameters (you must implement the logic). Also, this file contains a class method called process. This function will be called with each new frame, so you must implement the logic of your filter in there.
GStreamer module
In this case, these are the files that you’ll find under src/:
src/gst-plugins/contains the implementation of your GStreamer Element:{prefix}{name}.cpp {prefix}{name}.h {name}.csrc/server/implementation/objects/contains the server-side implementation of the JSON-RPC API:{Name}Impl.cpp {Name}Impl.hpp
In the file {Name}Impl.cpp you have to invoke the methods of your GStreamer element. The actual module logic should be implemented in the GStreamer Element.
For both kind of modules
If you need extra compilation dependencies, you can add compilation rules to the kurento-module-creator using the function generate_code in the src/server/CMakeLists.txt file.
The following parameters are available:
SERVER_STUB_DESTINATION (required)
The generated code that you may need to modify will be generated on the folder indicated by this parameter.
MODELS (required)
This parameter receives the folders where the models (.kmd files) are located.
INTERFACE_LIB_EXTRA_SOURCES, INTERFACE_LIB_EXTRA_HEADERS, INTERFACE_LIB_EXTRA_INCLUDE_DIRS, INTERFACE_LIB_EXTRA_LIBRARIES
These parameters allow to add additional source code to the static library. Files included in INTERFACE_LIB_EXTRA_HEADERS will be installed in the system as headers for this library. All the parameters accept a list as input.
SERVER_IMPL_LIB_EXTRA_SOURCES, SERVER_IMPL_LIB_EXTRA_HEADERS, SERVER_IMPL_LIB_EXTRA_INCLUDE_DIRS, SERVER_IMPL_LIB_EXTRA_LIBRARIES
These parameters allow to add additional source code to the interface library. Files included in SERVER_IMPL_LIB_EXTRA_HEADERS will be installed in the system as headers for this library. All the parameters accept a list as input.
MODULE_EXTRA_INCLUDE_DIRS, MODULE_EXTRA_LIBRARIES
These parameters allow to add extra include directories and libraries to the module.
SERVER_IMPL_LIB_FIND_CMAKE_EXTRA_LIBRARIES
This parameter receives a list of strings. Each string has this format:
libname [VersionRange]
where [VersionRange] can use these symbols:
AND,OR,<,<=,>,>=,^, and~.Note
^indicates a “compatible” version, under the definition of Semantic Versioning.~indicates a “similar” version, again according to the definition of SemVer.
Installation and usage
Before being able to use your new module, its binary files must be installed to the host where Kurento Media Server is running. Using a module with Kurento comprises two sides of the same coin:
Install the module. This allows Kurento to know about the module, so clients can instantiate objects and types provided by it.
Warning
To avoid C++ issues with ABI compatibility (which are usually caused by mixing compiler versions) you should build your module on the same system that Kurento was built. For example, if you run Kurento on Ubuntu 20.04, you should compile your module also on Ubuntu 20.04.
Do not mix system versions. For example, do not build your module on Ubuntu 20.04, and then try to install it on Ubuntu 18.04.
Use the module from client applications. Technically this step is optional, but unless your application directly implements the Kurento Protocol, you will want to use the client-side SDK that gets auto-generated from the Kurento Module Descriptor files (
*.kmd.json).
Install by copying files
You can just manually copy your plugin binary files to the destination machine. Then, the following environment variables must be set to instruct Kurento about where the plugin files have been copied:
export KURENTO_MODULES_PATH="/path/to/module:$KURENTO_MODULES_PATH"
export GST_PLUGIN_PATH="/path/to/module:$GST_PLUGIN_PATH"
Remember that if you’re starting Kurento with the system service files, these env vars should be set in /etc/default/kurento-media-server.
When ready, you should verify the module installation. Run Kurento twice, with the --version and --list arguments. The former shows a list of all installed modules and their versions, while the latter prints a list of all the actual MediaObject Factories that clients can invoke with the JSON-RPC API. Your own module should show up in both lists.
Following with the example from the previous section:
$ export KURENTO_MODULES_PATH="$HOME/video-module/build"
$ export GST_PLUGIN_PATH="$HOME/video-module/build"

$ /usr/bin/kurento-media-server --version
Kurento Media Server version: 7.0.0
Found modules:
    'core' version 7.0.0
    'elements' version 7.0.0
    'filters' version 7.0.0
    'appvideomodule' version 0.0.1~0.gd61e201

$ /usr/bin/kurento-media-server --list
Available factories:
    [...]
    AppVideoModule
    appvideomodule.AppVideoModule
Install with apt-get
The recommended way to distribute a module is to build it into a Debian package file (*.deb). This is the easiest and most convenient method for end users of the module, as they will just have to perform a simple package installation on any system where Kurento is already running. Besides, this doesn’t require the user to know anything about plugin paths or how the module files must be laid out on disk.
To build a Debian package file, you can either use the kurento-buildpackage tool as described in Create Deb packages, or do it manually by installing and running the appropriate tools:
# Install dpkg-buildpackage, the Debian package builder
sudo apt-get update ; sudo apt-get install --no-install-recommends \
    dpkg-dev

# Run dpkg-buildpackage to build Debian packages
dpkg-buildpackage -b -uc -us

# Copy the generated packages to their final destination
cp ../*.*deb /path/to/destination/
The Debian builder tool ends up generating one or more .deb package files in the parent directory from where it was called, together with some additional files that can be ignored. For example:
$ ls -1 ../*.*deb
../videomodule-dev_0.0.1~rc1_amd64.deb
../videomodule_0.0.1~rc1_amd64.deb
Depending on the contents of the module project, the Debian package builder can generate multiple .deb files:
The file without any suffix contains the shared library code that has been compiled from source code. This is the file that end users of the module will need to install in their systems.
-dev packages contain header files and are used by other developers to build their software upon the module’s code. This is not needed by end users.
-doc packages usually contain manpages and other documentation, if the module contained any.
-dbg and -dbgsym packages contain the debug symbols that have been extracted from the compilation process. It can be used by other developers to troubleshoot crashes and provide bug reports.
Now copy and install the package(s) into any Debian or Ubuntu based system where Kurento is already installed:
sudo dpkg -i videomodule_0.0.1~rc1_amd64.deb
For more information about the process of creating Debian packages, check these resources:
Install in Docker
It is perfectly possible to install and use additional Kurento modules with Docker-based deployments of Kurento Media Server. To do so, first follow any of the installation methods described above, but then instead of copying files to a host server you would add them into a Docker image or container.
Our recommendation is to leverage the FROM feature of Dockerfiles, to derive directly from a Kurento Docker image, and create your own fully customized image.
A Dockerfile such as this one would be a good enough starting point:
FROM kurento/kurento-media-server:7.3.0
COPY video-module_0.0.1~rc1_amd64.deb /
RUN dpkg -i /video-module_0.0.1~rc1_amd64.deb
Now build the new image:
$ docker build --tag kurento-with-video-module:7.3.0 .
Step 1/3 : FROM kurento/kurento-media-server:7.3.0
Step 2/3 : COPY video-module_0.0.1~rc1_amd64.deb /
Step 3/3 : RUN dpkg -i /video-module_0.0.1~rc1_amd64.deb
Successfully built d10d3b4a8202
Successfully tagged kurento-with-video-module:7.3.0
And verify your module is correctly loaded by Kurento:
$ docker run --rm kurento-with-video-module:7.3.0 --version
Kurento Media Server version: 7.0.0
Found modules:
    'core' version 7.0.0
    'elements' version 7.0.0
    'filters' version 7.0.0
    'appvideomodule' version 0.0.1~0.gd61e201

$ docker run --rm kurento-with-video-module:7.3.0 --list
Available factories:
    [...]
    AppVideoModule
    appvideomodule.AppVideoModule
Java client code
Change to the root directory of your module and run CMake:
cd video-module/

mkdir build/ ; cd build/
cmake -DGENERATE_JAVA_CLIENT_PROJECT=TRUE ..
This generates a build/java/ directory, containing all the client code. You can now run either of these commands:
make java(equivalent tomvn clean package) to build the Maven package.make java_install(equivalent tomvn clean install) to build the Maven package and install it into the local repository (typically located at $HOME/.m2/).
Finally, to actually use the module in your Maven project, you have to add the dependency to the pom.xml file:
<project>
    ...
    <dependencies>
        <dependency>
            <groupId>org.kurento.module</groupId>
            <artifactId>{name}</artifactId>
            <version>0.0.1-SNAPSHOT</version>
        </dependency>
    </dependencies>
    ...
</project>
Then you will be able to instantiate and use the new module in your Java code. For example, Kurento’s OpenCV plugin sample is used like this:
import org.kurento.module.opencvpluginsample.OpenCVPluginSample;
[...]
final OpenCVPluginSample myFilter =
  new OpenCVPluginSample.Builder(pipeline).build();
myFilter.setFilterType(0);
[...]
myWebRtcEndpoint1.connect(myFilter);
myFilter.connect(myWebRtcEndpoint2);
The result is, as expected, that the OpenCV plugin sample applies a Wikipedia: Canny edge detector to the original image:
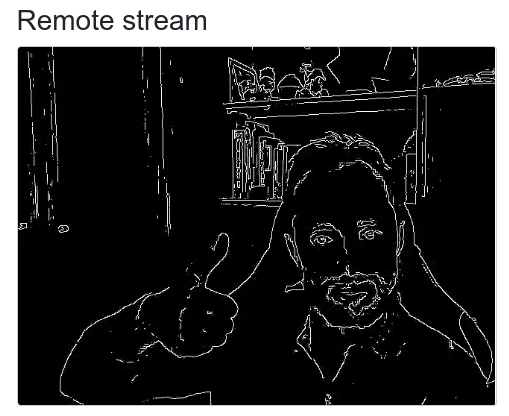
Kurento’s OpenCV plugin sample, applying a Canny edge detector
JavaScript client code
Change to the root directory of your module and run CMake:
cd video-module/

mkdir build/ ; cd build/
cmake -DGENERATE_JS_CLIENT_PROJECT=TRUE ..
This generates a build/js/ directory, containing all the client code. You can now manually copy this code to your application. Alternatively, you can use Bower (for Browser JavaScript) or NPM (for Node.js). To do that, you should add your JavaScript module as a dependency in your bower.json or package.json file, respectively:
"dependencies": {
  "{name}": "0.0.1"
}
Examples
Simple examples for both kinds of modules are available in the GitHub repo https://github.com/Kurento/kurento:
server/module-examples/gstreamer-exampleserver/module-examples/opencv-example
There are a lot of examples showing how to define methods, parameters or events in the “extra” modules that Kurento provides for demonstration purposes:
server/module-examples/pointerdetector/src/server/interfaceserver/module-examples/crowddetector/src/server/interfaceserver/module-examples/chroma/src/server/interfaceserver/module-examples/platedetector/src/server/interface
Besides that, all of the Kurento main modules are developed using this methodology, so you can also have a look in these at:
server/module-coreserver/module-elementsserver/module-filters