
Kurento Java Tutorial - Hello World
This web application has been designed to introduce the principles of programming with Kurento for Java developers. It consists of a WebRTC video communication in mirror (loopback). This tutorial assumes you have basic knowledge of Java, JavaScript, HTML and WebRTC. We also recommend reading Introduction to Kurento before starting this tutorial.
Note
Web browsers require using HTTPS to enable WebRTC, so the web server must use SSL and a certificate file. For instructions, check Configure a Java server to use HTTPS.
For convenience, this tutorial already provides dummy self-signed certificates (which will cause a security warning in the browser).
Quick start
Follow these steps to run this demo application:
Install Kurento Media Server: Installation Guide.
Run these commands:
git clone https://github.com/Kurento/kurento.git
cd kurento/tutorials/java/hello-world/
git checkout main
mvn -U clean spring-boot:run \
    -Dspring-boot.run.jvmArguments="-Dkms.url=ws://{KMS_HOST}:8888/kurento"
Open the demo page with a WebRTC-compliant browser (Chrome, Firefox): https://localhost:8443/
Click on Start to begin the demo.
Grant access to your webcam.
As soon as the loopback connection is negotiated and established, you should see your webcam video in both the local and remote placeholders.
Click on Stop to finish the demo.
Understanding this example
Kurento provides developers a Kurento Java Client to control the Kurento Media Server. This client library can be used in any kind of Java application: Server Side Web, Desktop, Android, etc. It is compatible with any framework like Java EE, Spring, Play, Vert.x, Swing and JavaFX.
This Hello World demo is one of the simplest web applications you can create with Kurento. The following picture shows a screenshot of this demo running:

Kurento Hello World Screenshot: WebRTC in loopback
The interface of the application (an HTML web page) is composed by two HTML5 <video> tags: one showing the local stream (as captured by the device webcam) and the other showing the remote stream sent by the media server back to the client.
The logic of the application is quite simple: the local stream is sent to the Kurento Media Server, which sends it back to the client without modifications. To implement this behavior, we need to create a Media Pipeline composed by a single Media Element, i.e. a WebRtcEndpoint, which holds the capability of exchanging full-duplex (bidirectional) WebRTC media flows. This media element is connected to itself so that the media it receives (from browser) is sent back (to browser). This media pipeline is illustrated in the following picture:
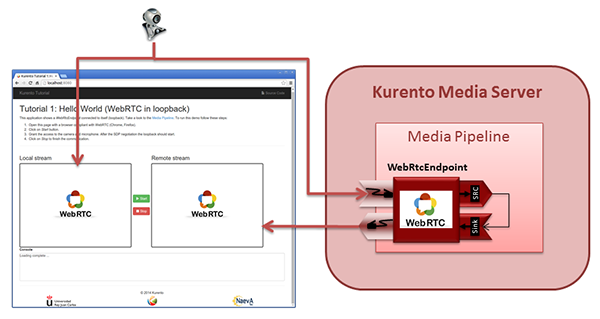
Kurento Hello World Media Pipeline in context
This is a web application, and therefore it follows a client-server architecture. At the client-side, the logic is implemented in JavaScript. At the server-side, we use a Spring-Boot based application server consuming the Kurento Java Client API, to control Kurento Media Server capabilities. All in all, the high level architecture of this demo is three-tier. To communicate these entities, two WebSockets are used:
A WebSocket is created between client and application server to implement a custom signaling protocol.
Another WebSocket is used to perform the communication between the Kurento Java Client and the Kurento Media Server.
This communication takes place using the Kurento Protocol. For a detailed description, please read this section: Kurento Protocol.
The diagram below shows a complete sequence diagram, of the interactions with the application interface to: i) JavaScript logic; ii) Application server logic (which uses the Kurento Java Client); iii) Kurento Media Server.
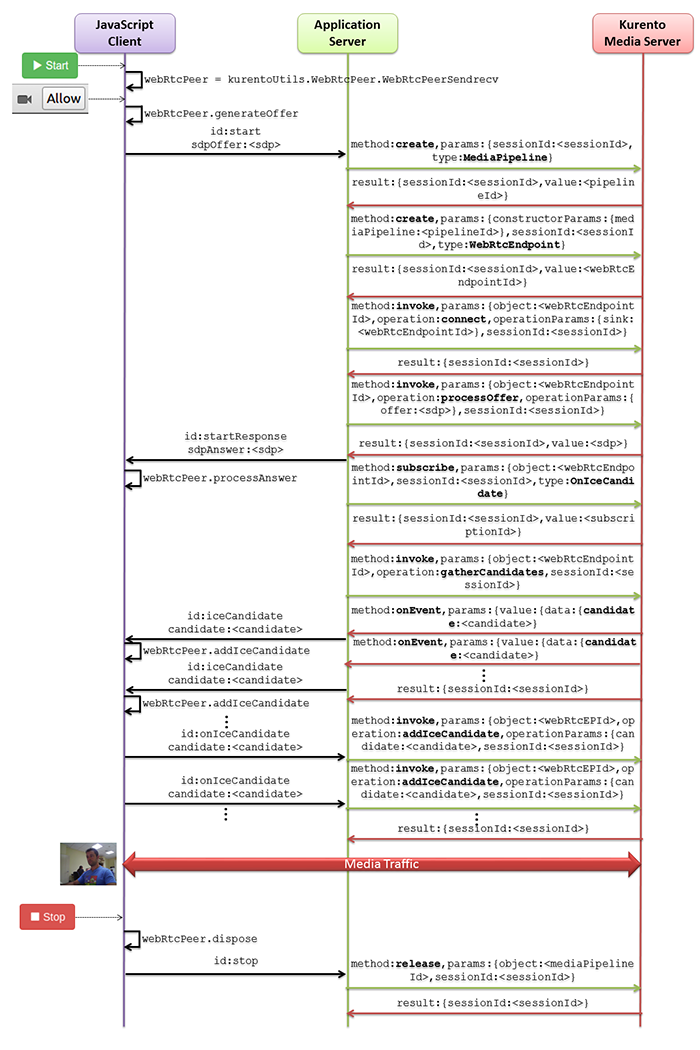
Complete sequence diagram of Kurento Hello World (WebRTC in loopbak) demo
The following sections analyze in depth the server (Java) and client-side (JavaScript) code of this application. The complete source code can be found in GitHub.
Application Server Logic
This demo has been developed using Java in the server-side, based on the Spring Boot framework, which embeds a Tomcat web server within the generated maven artifact, and thus simplifies the development and deployment process.
Note
You can use whatever Java server side technology you prefer to build web applications with Kurento. For example, a pure Java EE application, SIP Servlets, Play, Vert.x, etc. Here we chose Spring Boot for convenience.
In the following, figure you can see a class diagram of the server side code:
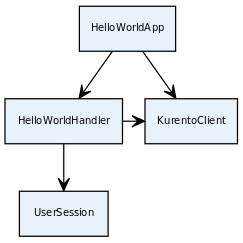
Server-side class diagram of the HelloWorld app
The main class of this demo is HelloWorldApp.
As you can see, the KurentoClient is instantiated in this class as a Spring Bean. This bean is used to create Kurento Media Pipelines, which are used to add media capabilities to the application. In this instantiation we see that we need to specify to the client library the location of the Kurento Media Server. In this example, we assume it is located at localhost, listening in port TCP 8888. If you reproduce this example, you’ll need to insert the specific location of your Kurento Media Server instance there.
Once the Kurento Client has been instantiated, you are ready for communicating with Kurento Media Server and controlling its multimedia capabilities.
@SpringBootApplication
@EnableWebSocket
public class HelloWorldApp implements WebSocketConfigurer {
  @Bean
  public HelloWorldHandler handler() {
    return new HelloWorldHandler();
  }

  @Bean
  public KurentoClient kurentoClient() {
    return KurentoClient.create();
  }

  @Override
  public void registerWebSocketHandlers(WebSocketHandlerRegistry registry) {
    registry.addHandler(handler(), "/helloworld");
  }

  public static void main(String[] args) throws Exception {
    SpringApplication.run(HelloWorldApp.class, args);
  }
}
This web application follows a Single Page Application architecture (SPA), and uses a WebSocket to communicate with the application server, by means of requests and responses. Specifically, the main app class implements the interface WebSocketConfigurer to register a WebSocketHandler that processes WebSocket requests in the path /helloworld.
The class HelloWorldHandler
implements TextWebSocketHandler to handle text WebSocket requests. The central piece of this class is the method handleTextMessage. This method implements the actions for requests, returning responses through the WebSocket. In other words, it implements the server part of the signaling protocol depicted in the previous sequence diagram.
public void handleTextMessage(WebSocketSession session, TextMessage message)
    throws Exception {
  [...]
  switch (messageId) {
    case "start":
      start(session, jsonMessage);
      break;
    case "stop": {
      stop(session);
      break;
    }
    case "onIceCandidate":
      onRemoteIceCandidate(session, jsonMessage);
      break;
    default:
      sendError(session, "Invalid message, ID: " + messageId);
      break;
  }
  [...]
}
The start() method performs the following actions:
Configure media processing logic. This is the part in which the application configures how Kurento has to process the media. In other words, the media pipeline is created here. To that aim, the object KurentoClient is used to create a MediaPipeline object. Using it, the media elements we need are created and connected. In this case, we only instantiate one WebRtcEndpoint for receiving the WebRTC stream and sending it back to the client.
final MediaPipeline pipeline = kurento.createMediaPipeline();

final WebRtcEndpoint webRtcEp =
    new WebRtcEndpoint.Builder(pipeline).build();

webRtcEp.connect(webRtcEp);
Create event listeners. All objects managed by Kurento have the ability to emit several types of events, as explained in Endpoint Events. Application Servers can listen for them in order to have more insight about what is going on inside the processing logic of the media server. It is a good practice to listen for all possible events, so the client application has as much information as possible.
// Common events for all objects that inherit from BaseRtpEndpoint
addErrorListener(
    new EventListener<ErrorEvent>() { ... });
addMediaFlowInStateChangedListener(
    new EventListener<MediaFlowInStateChangedEvent>() { ... });
addMediaFlowOutStateChangedListener(
    new EventListener<MediaFlowOutStateChangedEvent>() { ... });
addConnectionStateChangedListener(
    new EventListener<ConnectionStateChangedEvent>() { ... });
addMediaStateChangedListener(
    new EventListener<MediaStateChangedEvent>() { ... });
addMediaTranscodingStateChangedListener(
    new EventListener<MediaTranscodingStateChangedEvent>() { ... });

// Events specific to objects of class WebRtcEndpoint
addIceCandidateFoundListener(
    new EventListener<IceCandidateFoundEvent>() { ... });
addIceComponentStateChangedListener(
    new EventListener<IceComponentStateChangedEvent>() { ... });
addIceGatheringDoneListener(
    new EventListener<IceGatheringDoneEvent>() { ... });
addNewCandidatePairSelectedListener(
    new EventListener<NewCandidatePairSelectedEvent>() { ... });
WebRTC SDP negotiation. In WebRTC, the SDP Offer/Answer model is used to negotiate the audio or video tracks that will be exchanged between peers, together with a subset of common features that they support. This negotiation is done by generating an SDP Offer in one of the peers, sending it to the other peer, and bringing back the SDP Answer that will be generated in response.
In this particular case, the SDP Offer has been generated by the browser and is sent to Kurento, which then generates an SDP Answer that must be sent back to the browser as a response.
// 'webrtcSdpOffer' is the SDP Offer generated by the browser;
// send the SDP Offer to KMS, and get back its SDP Answer
String webrtcSdpAnswer = webRtcEp.processOffer(webrtcSdpOffer);
sendMessage(session, webrtcSdpAnswer);
Gather ICE candidates. While the SDP Offer/Answer negotiation is taking place, each one of the peers can start gathering the connectivity candidates that will be used for the ICE protocol. This process works very similarly to how a browser notifies its client code of each newly discovered candidate by emitting the event RTCPeerConnection.onicecandidate; likewise, Kurento’s WebRtcEndpoint will notify its client application for each gathered candidate via the event
IceCandidateFound.webRtcEp.gatherCandidates();
Client-Side Logic
Let’s move now to the client-side of the application. To call the previously created WebSocket service in the server-side, we use the JavaScript class WebSocket. We use a specific Kurento JavaScript library called kurento-utils.js to simplify the WebRTC interaction with the server. This library depends on adapter.js, which is a JavaScript WebRTC utility maintained by Google that abstracts away browser differences.
These libraries are brought to the project as Maven dependencies which download all required files from WebJars.org; they are loaded in the index.html page, and are used in the index.js file.
In the following snippet we can see the creation of the WebSocket in the path /helloworld. Then, the onmessage listener of the
WebSocket is used to implement the JSON signaling protocol in the client-side. Notice that there are three incoming messages to client: startResponse, error, and iceCandidate. Convenient actions are taken to implement each step in the communication. For example, in function start, the function WebRtcPeer.WebRtcPeerSendrecv of kurento-utils.js is used to start a WebRTC communication.
var ws = new WebSocket('ws://' + location.host + '/helloworld');

ws.onmessage = function(message) {
   var parsedMessage = JSON.parse(message.data);
   console.info('Received message: ' + message.data);

   switch (parsedMessage.id) {
   case 'startResponse':
      startResponse(parsedMessage);
      break;
   case 'error':
      if (state == I_AM_STARTING) {
         setState(I_CAN_START);
      }
      onError('Error message from server: ' + parsedMessage.message);
      break;
   case 'iceCandidate':
      webRtcPeer.addIceCandidate(parsedMessage.candidate, function(error) {
         if (error)
            return console.error('Error adding candidate: ' + error);
      });
      break;
   default:
      if (state == I_AM_STARTING) {
         setState(I_CAN_START);
      }
      onError('Unrecognized message', parsedMessage);
   }
}

function start() {
   console.log('Starting video call ...');

   // Disable start button
   setState(I_AM_STARTING);
   showSpinner(videoInput, videoOutput);

   console.log('Creating WebRtcPeer and generating local sdp offer ...');

   var options = {
      localVideo : videoInput,
      remoteVideo : videoOutput,
      onicecandidate : onIceCandidate
   }
   webRtcPeer = new kurentoUtils.WebRtcPeer.WebRtcPeerSendrecv(options,
         function(error) {
            if (error)
               return console.error(error);
            webRtcPeer.generateOffer(onOffer);
         });
}

function onOffer(error, offerSdp) {
   if (error)
      return console.error('Error generating the offer');
   console.info('Invoking SDP offer callback function ' + location.host);
   var message = {
      id : 'start',
      sdpOffer : offerSdp
   }
   sendMessage(message);
}

function onIceCandidate(candidate) {
   console.log('Local candidate' + JSON.stringify(candidate));

   var message = {
      id : 'onIceCandidate',
      candidate : candidate
   };
   sendMessage(message);
}

function startResponse(message) {
   setState(I_CAN_STOP);
   console.log('SDP answer received from server. Processing ...');

   webRtcPeer.processAnswer(message.sdpAnswer, function(error) {
      if (error)
         return console.error(error);
   });
}

function stop() {
   console.log('Stopping video call ...');
   setState(I_CAN_START);
   if (webRtcPeer) {
      webRtcPeer.dispose();
      webRtcPeer = null;

      var message = {
         id : 'stop'
      }
      sendMessage(message);
   }
   hideSpinner(videoInput, videoOutput);
}

function sendMessage(message) {
   var jsonMessage = JSON.stringify(message);
   console.log('Sending message: ' + jsonMessage);
   ws.send(jsonMessage);
}
Dependencies
This Java Spring application is implemented using Maven. The relevant part of the pom.xml is where Kurento dependencies are declared. As the following snippet shows, we need two dependencies: the Kurento Client Java dependency (kurento-client) and the JavaScript Kurento utility library (kurento-utils) for the client-side. Other client libraries are managed with WebJars.