Node.js Module - Crowd Detector Filter
This web application consists of a WebRTC video communication in mirror (loopback) with a crowd detector filter. This filter detects people agglomeration in video streams.
Note
Web browsers require using HTTPS to enable WebRTC, so the web server must use SSL and a certificate file. For instructions, check Configure a Node.js server to use HTTPS.
For convenience, this tutorial already provides dummy self-signed certificates (which will cause a security warning in the browser).
For the impatient: running this example
First of all, you should install Kurento Media Server to run this demo. Please
visit the installation guide for further
information. In addition, the built-in module kurento-module-crowddetector should
be also installed:
sudo apt-get install kurento-module-crowddetector
Be sure to have installed Node.js in your system. In an Ubuntu machine, you can install it as follows:
curl -sSL https://deb.nodesource.com/setup_18.x | sudo -E bash -
sudo apt-get install -y nodejs
To launch the application, you need to clone the GitHub project where this demo is hosted, install it and run it:
git clone https://github.com/Kurento/kurento.git
cd kurento/tutorials/javascript-node/crowddetector/
git checkout 7.0.0
npm install
npm start
If you have problems installing any of the dependencies, please remove them and clean the npm cache, and try to install them again:
rm -r node_modules
npm cache clean
Finally, access the application connecting to the URL https://localhost:8443/ through a WebRTC capable browser (Chrome, Firefox).
Note
These instructions work only if Kurento Media Server is up and running in the same machine
as the tutorial. However, it is possible to connect to a remote KMS in other machine, simply adding
the argument ws_uri to the npm execution command, as follows:
npm start -- --ws_uri=ws://{KMS_HOST}:8888/kurento
In this case you need to use npm version 2. To update it you can use this command:
sudo npm install npm -g
Understanding this example
This application uses computer vision and augmented reality techniques to detect a crowd in a WebRTC stream.
The interface of the application (an HTML web page) is composed by two HTML5 video tags: one for the video camera stream (the local client-side stream) and other for the mirror (the remote stream). The video camera stream is sent to Kurento Media Server, which processes and sends it back to the client as a remote stream. To implement this, we need to create a Media Pipeline composed by the following Media Element s:

WebRTC with crowdDetector filter Media Pipeline
The complete source code of this demo can be found in GitHub.
This example is a modified version of the Magic Mirror tutorial. In this case, this demo uses a CrowdDetector instead of FaceOverlay filter.
To setup a CrowdDetectorFilter, first we need to define one or more
region of interests (ROIs). A ROI delimits the zone within the video stream
in which crowd are going to be tracked. To define a ROI, we need to configure
at least three points. These points are defined in relative terms (0 to 1) to
the video width and height.
CrowdDetectorFilter performs two actions in the defined ROIs. On the one
hand, the detected crowd are colored over the stream. On the other hand,
different events are raised to the client.
To understand crowd coloring, we can take a look to a screenshot of a running
example of CrowdDetectorFilter. In the picture below, we can see that there
are two ROIs (bounded with white lines in the video). On these ROIs, we can see
two different colors over the original video stream: red zones are drawn over
detected static crowds (or moving slowly). Blue zones are drawn over the
detected crowds moving fast.
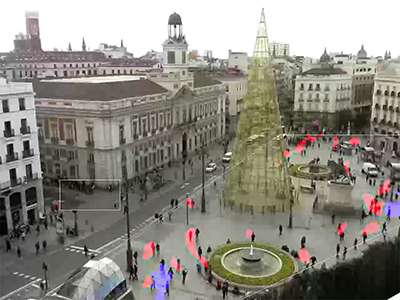
Crowd detection sample
Regarding crowd events, there are three types of events, namely:
CrowdDetectorFluidityEvent. Event raised when a certain level of fluidity is detected in a ROI. Fluidity can be seen as the level of general movement in a crowd.
CrowdDetectorOccupancyEvent. Event raised when a level of occupancy is detected in a ROI. Occupancy can be seen as the level of agglomeration in stream.
CrowdDetectorDirectionEvent. Event raised when a movement direction is detected in a ROI by a crowd.
Both fluidity as occupancy are quantified in a relative metric from 0 to 100%. Then, both attributes are qualified into three categories: i) Minimum (min); ii) Medium (med); iii) Maximum (max).
Regarding direction, it is quantified as an angle (0-360º), where 0 is the direction from the central point of the video to the top (i.e., north), 90 correspond to the direction to the right (east), 180 is the south, and finally 270 is the west.
With all these concepts, now we can check out the Java server-side code of this
demo. As depicted in the snippet below, we create a ROI by adding
RelativePoint instances to a list. Each ROI is then stored into a list of
RegionOfInterest instances.
Then, each ROI should be configured. To do that, we have the following methods:
fluidityLevelMin: Fluidity level (0-100%) for the category minimum.
fluidityLevelMed: Fluidity level (0-100%) for the category medium.
fluidityLevelMax: Fluidity level (0-100%) for the category maximum.
fluidityNumFramesToEvent: Number of consecutive frames detecting a fluidity level to rise a event.
occupancyLevelMin: Occupancy level (0-100%) for the category minimum.
occupancyLevelMed: Occupancy level (0-100%) for the category medium.
occupancyLevelMax: Occupancy level (0-100%) for the category maximum.
occupancyNumFramesToEvent: Number of consecutive frames detecting a occupancy level to rise a event.
sendOpticalFlowEvent: Boolean value that indicates whether or not directions events are going to be tracked by the filter. Be careful with this feature, since it is very demanding in terms of resource usage (CPU, memory) in the media server. Set to true this parameter only when you are going to need directions events in your client-side.
opticalFlowNumFramesToEvent: Number of consecutive frames detecting a direction level to rise a event.
opticalFlowNumFramesToReset: Number of consecutive frames detecting a occupancy level in which the counter is reset.
opticalFlowAngleOffset: Counterclockwise offset of the angle. This parameters is useful to move the default axis for directions (0º=north, 90º=east, 180º=south, 270º=west).
Note
Modules can have options. For configuring these options, you’ll need to get the constructor for them. In JavaScript and Node.js, you have to use kurentoClient.getComplexType(‘qualifiedName’) . There is an example in the code.
All in all, the media pipeline of this demo is is implemented as follows:
...
kurento.register('kurento-module-crowddetector');
const RegionOfInterest       = kurento.getComplexType('crowddetector.RegionOfInterest');
const RegionOfInterestConfig = kurento.getComplexType('crowddetector.RegionOfInterestConfig');
const RelativePoint          = kurento.getComplexType('crowddetector.RelativePoint');
...

function start(sessionId, ws, sdpOffer, callback) {
    if (!sessionId) {
        return callback('Cannot use undefined sessionId');
    }

    getKurentoClient(function(error, kurentoClient) {
        if (error) {
            return callback(error);
        }

        kurentoClient.create('MediaPipeline', function(error, pipeline) {
            if (error) {
                return callback(error);
            }

            createMediaElements(pipeline, ws, function(error, webRtcEndpoint, filter) {
                if (error) {
                    pipeline.release();
                    return callback(error);
                }

                if (candidatesQueue[sessionId]) {
                    while(candidatesQueue[sessionId].length) {
                        var candidate = candidatesQueue[sessionId].shift();
                        webRtcEndpoint.addIceCandidate(candidate);
                    }
                }

                connectMediaElements(webRtcEndpoint, filter, function(error) {
                    if (error) {
                        pipeline.release();
                        return callback(error);
                    }

                    filter.on('CrowdDetectorDirection', function (_data){
                        return callback(null, 'crowdDetectorDirection', _data);
                    });

                    filter.on('CrowdDetectorFluidity', function (_data){
                        return callback(null, 'crowdDetectorFluidity', _data);
                    });

                    filter.on('CrowdDetectorOccupancy', function (_data){
                        return callback(null, 'crowdDetectorOccupancy', _data);
                    });

                    webRtcEndpoint.on('IceCandidateFound', function(event) {
                        var candidate = kurento.getComplexType('IceCandidate')(event.candidate);
                        ws.send(JSON.stringify({
                            id : 'iceCandidate',
                            candidate : candidate
                        }));
                    });

                    webRtcEndpoint.processOffer(sdpOffer, function(error, sdpAnswer) {
                        if (error) {
                            pipeline.release();
                            return callback(error);
                        }

                        sessions[sessionId] = {
                            'pipeline' : pipeline,
                            'webRtcEndpoint' : webRtcEndpoint
                        }
                        return callback(null, 'sdpAnswer', sdpAnswer);
                    });

                    webRtcEndpoint.gatherCandidates(function(error) {
                        if (error) {
                            return callback(error);
                        }
                    });
                });
            });
        });
    });
}

function createMediaElements(pipeline, ws, callback) {
    pipeline.create('WebRtcEndpoint', function(error, webRtcEndpoint) {
        if (error) {
            return callback(error);
        }

        var options = {
          rois: [
            RegionOfInterest({
              id: 'roi1',
              points: [
                RelativePoint({x: 0  , y: 0  }),
                RelativePoint({x: 0.5, y: 0  }),
                RelativePoint({x: 0.5, y: 0.5}),
                RelativePoint({x: 0  , y: 0.5})
              ],
              regionOfInterestConfig: RegionOfInterestConfig({
                occupancyLevelMin: 10,
                occupancyLevelMed: 35,
                occupancyLevelMax: 65,
                occupancyNumFramesToEvent: 5,
                fluidityLevelMin: 10,
                fluidityLevelMed: 35,
                fluidityLevelMax: 65,
                fluidityNumFramesToEvent: 5,
                sendOpticalFlowEvent: false,
                opticalFlowNumFramesToEvent: 3,
                opticalFlowNumFramesToReset: 3,
                opticalFlowAngleOffset: 0
              })
            })
          ]
        }
        pipeline.create('crowddetector.CrowdDetectorFilter', options, function(error, filter) {
            if (error) {
                return callback(error);
            }

            return callback(null, webRtcEndpoint, filter);
        });
    });
}
Dependencies
Dependencies of this demo are managed using NPM. Our main dependency is the Kurento Client JavaScript (kurento-client). The relevant part of the package.json file for managing this dependency is:
"dependencies": {
   "kurento-client" : "7.0.0"
}
At the client side, dependencies are managed using Bower. Take a look to the bower.json file and pay attention to the following section:
"dependencies": {
   "kurento-utils" : "7.0.0",
   "kurento-module-pointerdetector": "7.0.0"
}